This guide contains instructions on integrating Synerise with the store built on the Store Framework. If you are unsure which framework is used in your project, become familiar with the VTEX documentation.
You can use the Synerise plugin in your eshop built on VTEX IO ecommerce platform to transmit the data from your website to Synerise, so you can utilize it for analyses and your business campaigns.
If there are no requests in 60 minutes, the service deactivates. The first request that re-activates the service after 60 minutes of inactivity is automatically lost.
Plugin scope
Tracking transaction, cart, and customer activity events
Tracking the checkout page
Identifying customers after they filled out the form
Synchronizing data between Synerise and VTEX through webhooks: creating, updating, and removing accounts; marketing consent changes
Implementing a service worker for displaying web push notifications
Exporting historical data about customers and orders from VTEX to Synerise.
Prerequisites
You must be granted user permissions to access API key section and add the key in Synerise.
In VTEX, create a workspace with products you want to display in your shop.
Configuration in Synerise
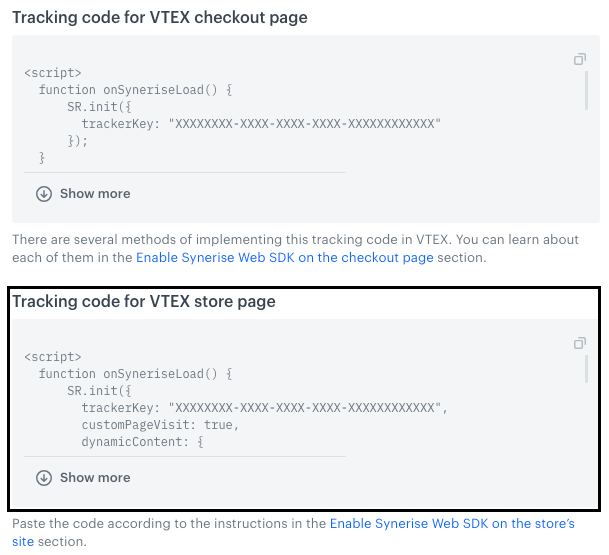
Generate the tracking code
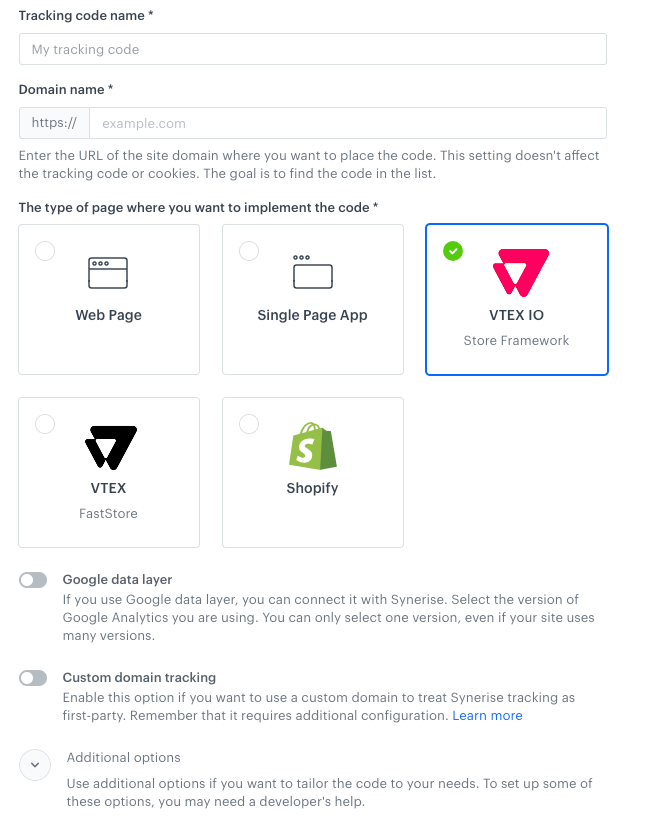
To enable tracking the customer activity on your website, create a tracking code which you will implement into your store later in the process.
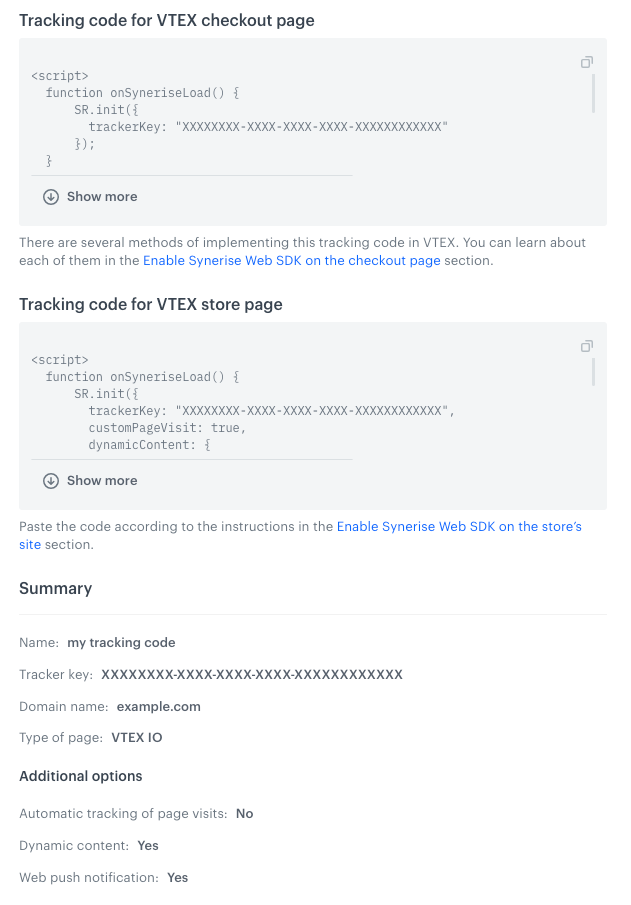
In Synerise, go to Settings > Tracking codes and generate a tracking code dedicated to VTEX. Full instruction on generating tracking codes is available here. Generating tracking code in SyneriseResult: Synerise generates 2 tracking codes.
Create an API key with specific permissions (the list is available in the instruction below), which will enable authorization between Synerise and VTEX.
In Synerise, go to Settings > API Keys > Add API key.
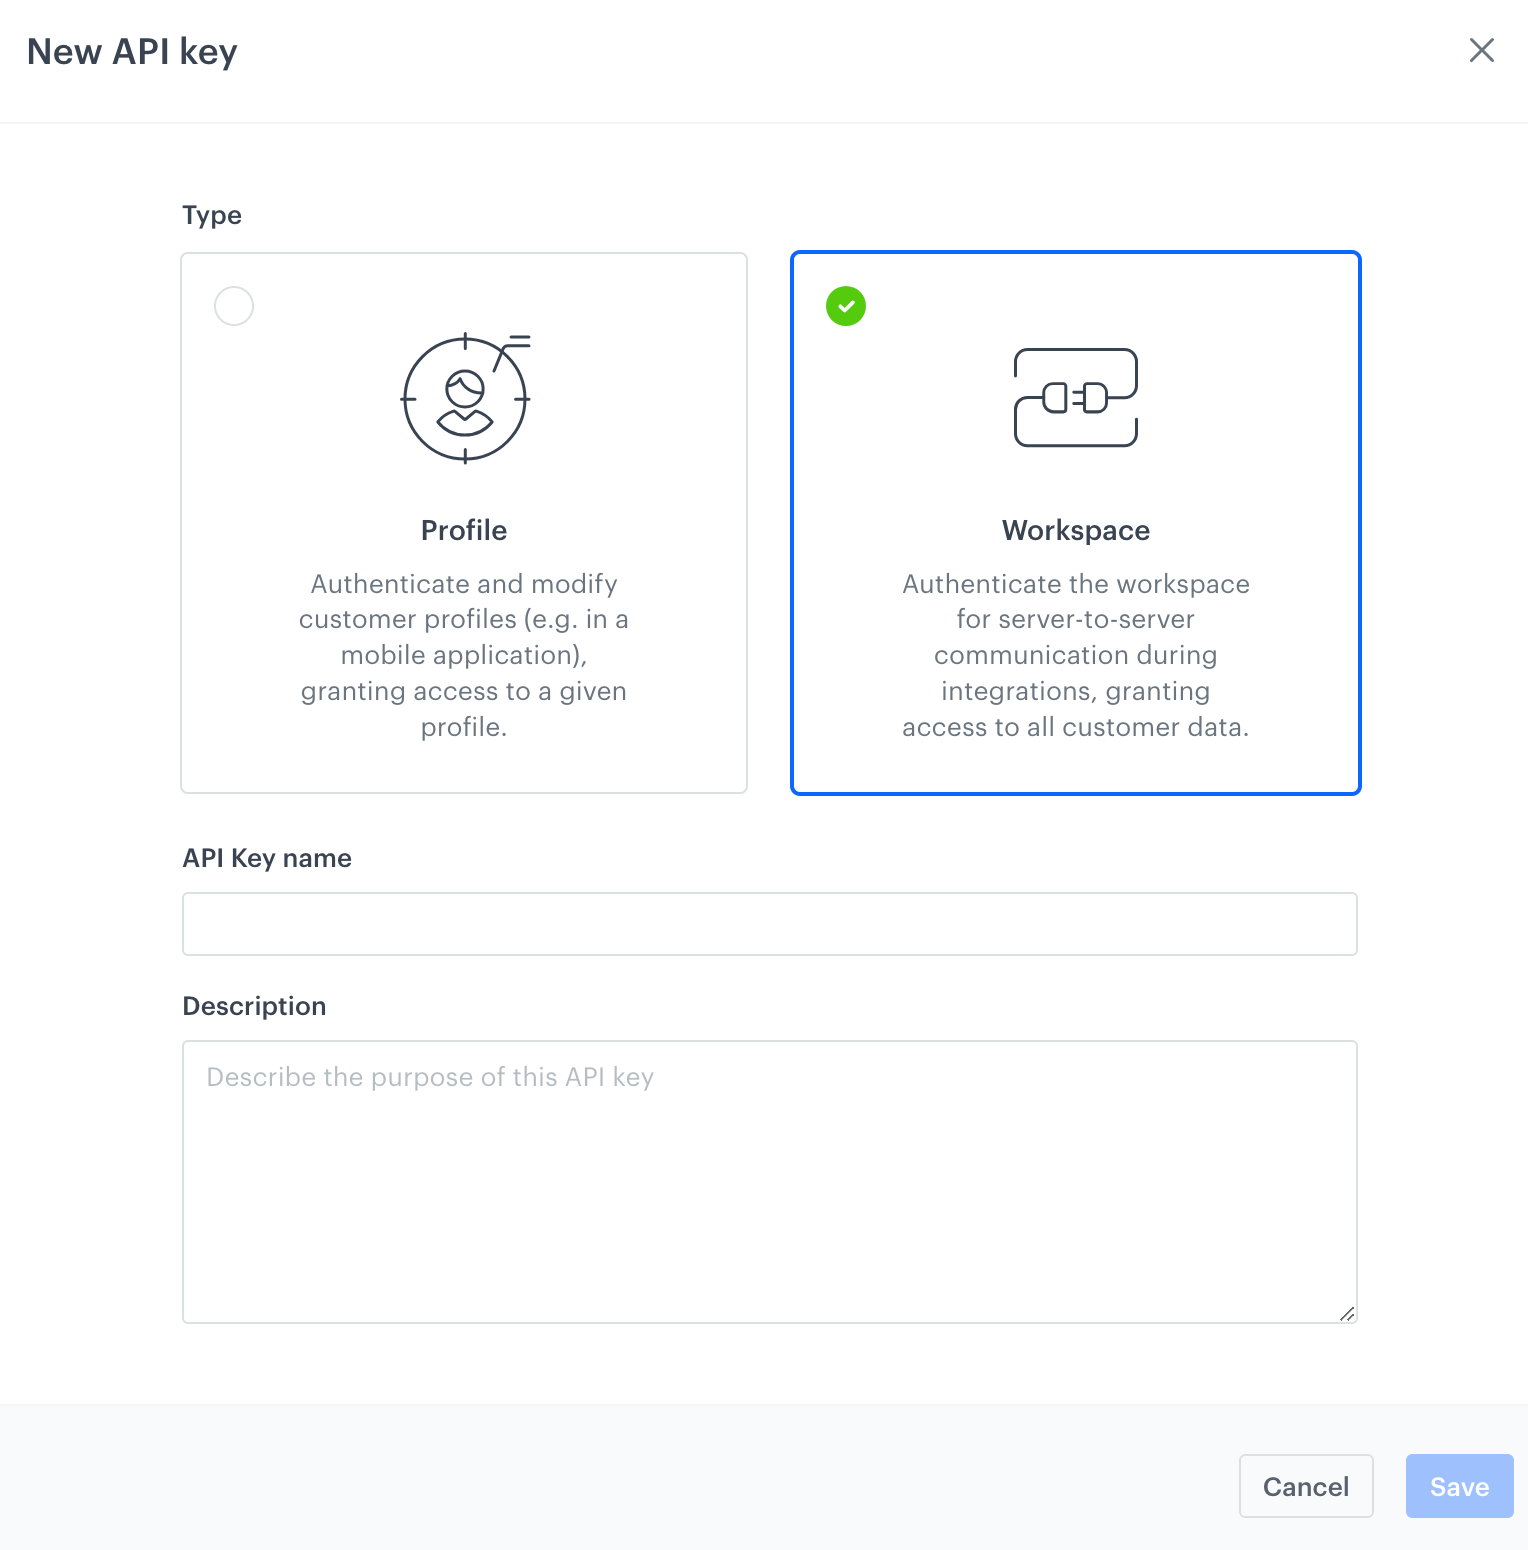
On the pop-up:
Select Workspace.
Enter the name of the API key (it will be visible on the list of API keys).
Optionally, in the Description field, you can provide a brief explanation for the purpose of the key. This will help you and your team in identifying the key promptly on the API key list.
Adding a new API key for the VTEX integration
Confirm by clicking Save.
Find the key on the top of API key list and click Permissions.
On the pop-up, select all the permissions listed below to enable complete synchronization of data between Synerise and VTEX:
Click to expand the list of permissions
CATALOG:
CATALOGS_CATALOG_CREATE
CATALOGS_CATALOG_READ
CATALOGS_ITEM_BATCH_CATALOG_CREATE
CLIENT:
API_BATCH_CLIENT_CREATE
API_CLIENT_CREATE
EVENTS:
API_ADDED_TO_CART_EVENTS_CREATE
API_ADDED_TO_FAVORITES_EVENTS_CREATE
API_CUSTOM_EVENTS_CREATE
API_LOGGED_IN_EVENTS_CREATE
API_LOGGED_OUT_EVENTS_CREATE
API_REGISTERED_EVENTS_CREATE
API_REMOVED_FROM_CART_EVENTS_CREATE
INTEGRATIONS:
IMPORT_FEEDER_LOGS_INTEGRATIONS_CREATE
TRACKER
TRACKER_CREATE
TRANSACTION
API_BATCH_TRANSACTION_CREATE
API_TRANSACTION_CREATE
VTEX
IMPORT_FEEDER_INTEGRATION_VTEX_CREATE
IMPORT_FEEDER_INTEGRATION_VTEX_READ
IMPORT_FEEDER_INTEGRATION_VTEX_DELETE
IMPORT_FEEDER_INTEGRATION_VTEX_UPDATE
IMPORT_FEEDER_LOGS_INTEGRATIONS_CREATE
IMPORT_FEEDER_SYNCHRONIZATIONS_VTEX_READ
IMPORT_FEEDER_SYNCHRONIZATION_VTEX_CREATE
IMPORT_FEEDER_SYNCHRONIZATION_VTEX_DELETE
Confirm by clicking Apply settings.
Close the pop-up with permissions.
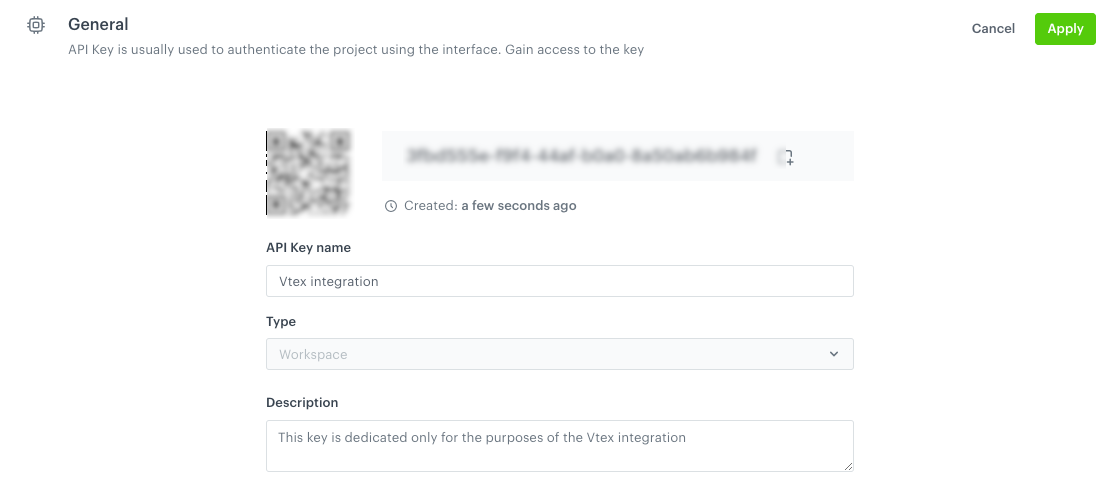
On the General section, click Show.
Copy the API key into the notepad. Details of the API key
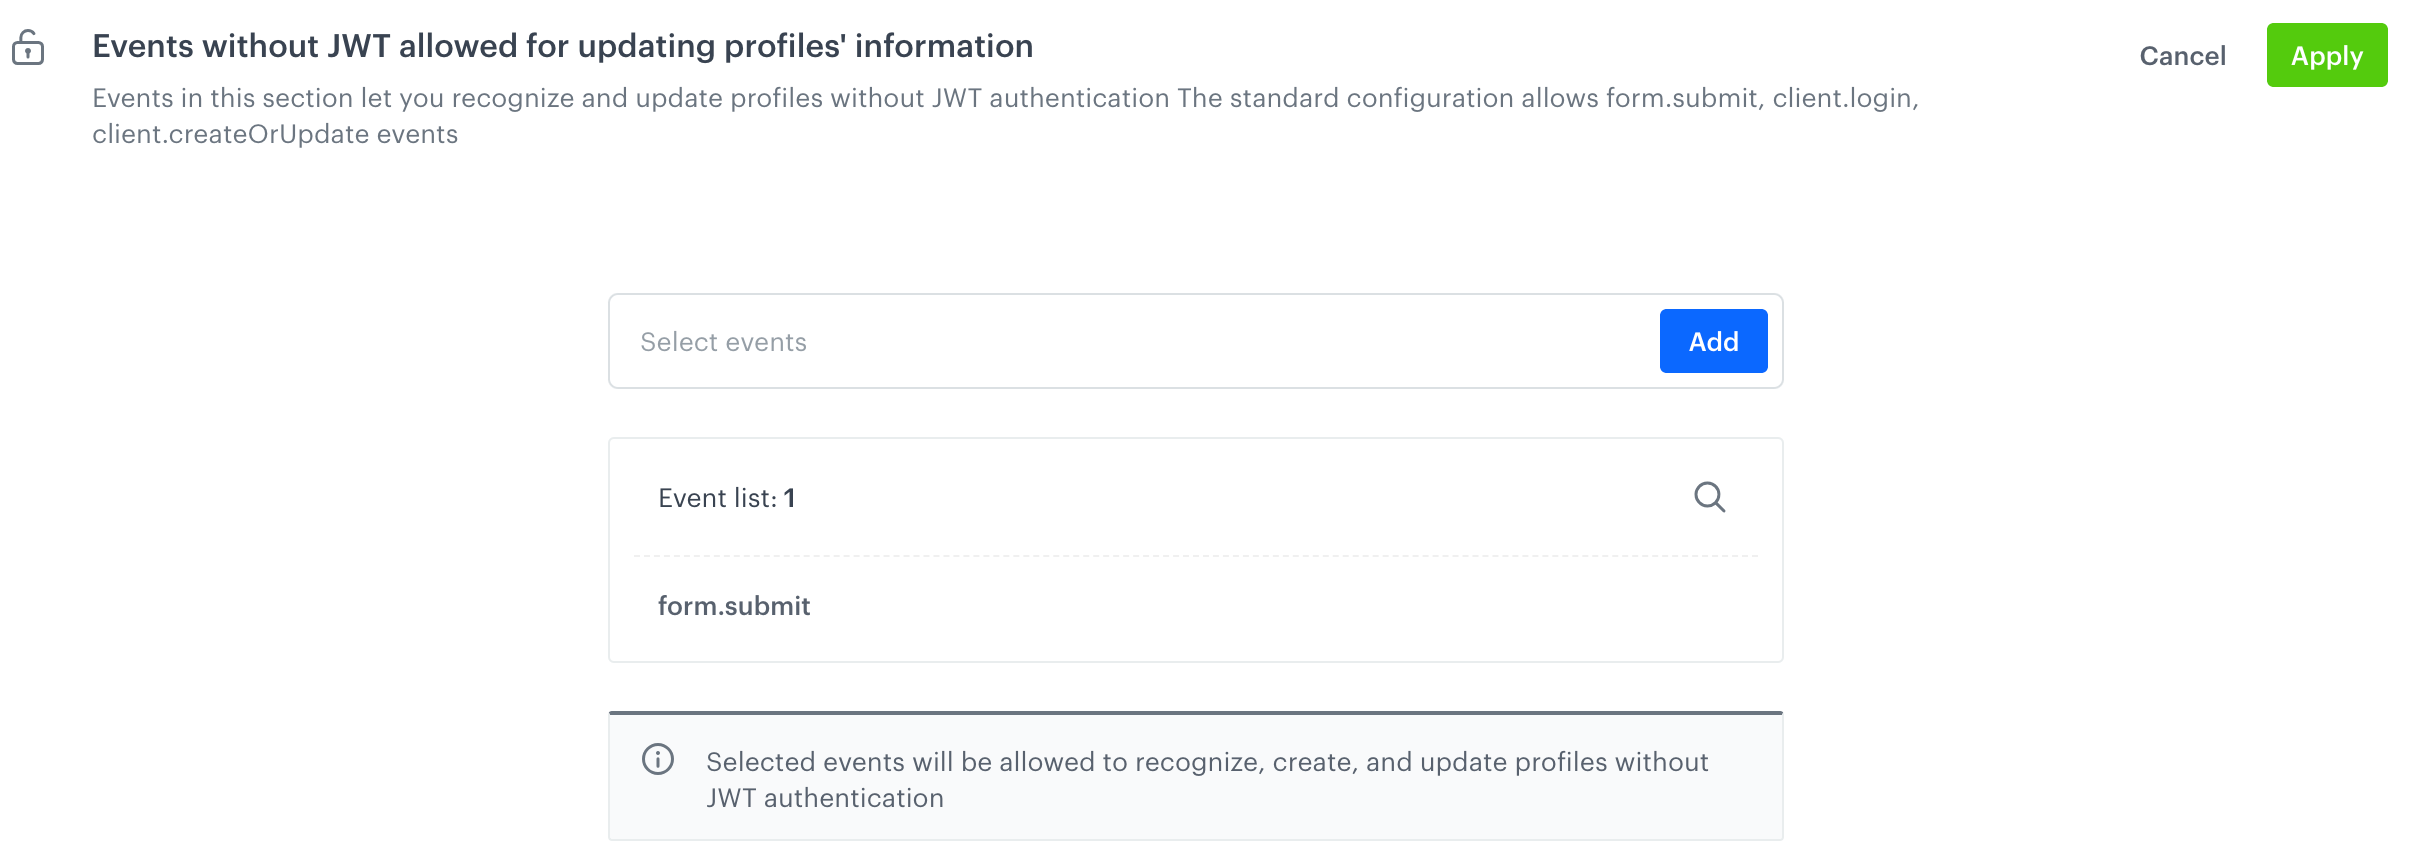
Enable updating profile information with specific events
To prevent duplicating customers' accounts when they become identified, make it possible for specific events to update profile information without JWT authorization.
Go to Data Modeling Hub > Events.
Select the JS SDK event settings tab.
In the Events without JWT allowed for updating profiles' information section, click Define.
From the Select events dropdown list, select form.submit
Confirm by clicking Add. Configuration of the section
Confirm the settings by clicking Apply.
Prepare tracking events on the checkout page
In this part of the process, you will use a ready-to-use dynamic content template available in the Synerise platform. This template includes JavaScript that's inserted into the checkout page to identify customers when they fill out a form and to track events on the checkout page. By default, the dynamic content from this template doesn't include any elements visible on the site.
This dynamic content starts working after you enable Synerise SDK on the checkout page. This is described later in this article.
Go to Experience Hub > Dynamic Content > Create new.
Enter the name of the dynamic content.
As the dynamic content type, select Insert object.
In the Audience section, select the Everyone tab.
In the Content section, set the CSS Selector option to After.
In the text field, enter .snrs-modal-wrapper This sets the dynamic content to be injected after one of the elements created when Synerise JS SDK is initialized. If you need to, you can set a different selector.
Click Create message.
Select Script templates.
From the Script templates library, select VTEX - tracking events on checkout page. The template is ready to be used, it contains all necessary scripts that track events and identify customers when they fill out the form.
If needed, you can make changes to the templates.
You can learn more how to edit a template in a dynamic content template builder here.
In the upper right corner, click Use in communication.
Confirm the settings in the Content section by clicking Apply.
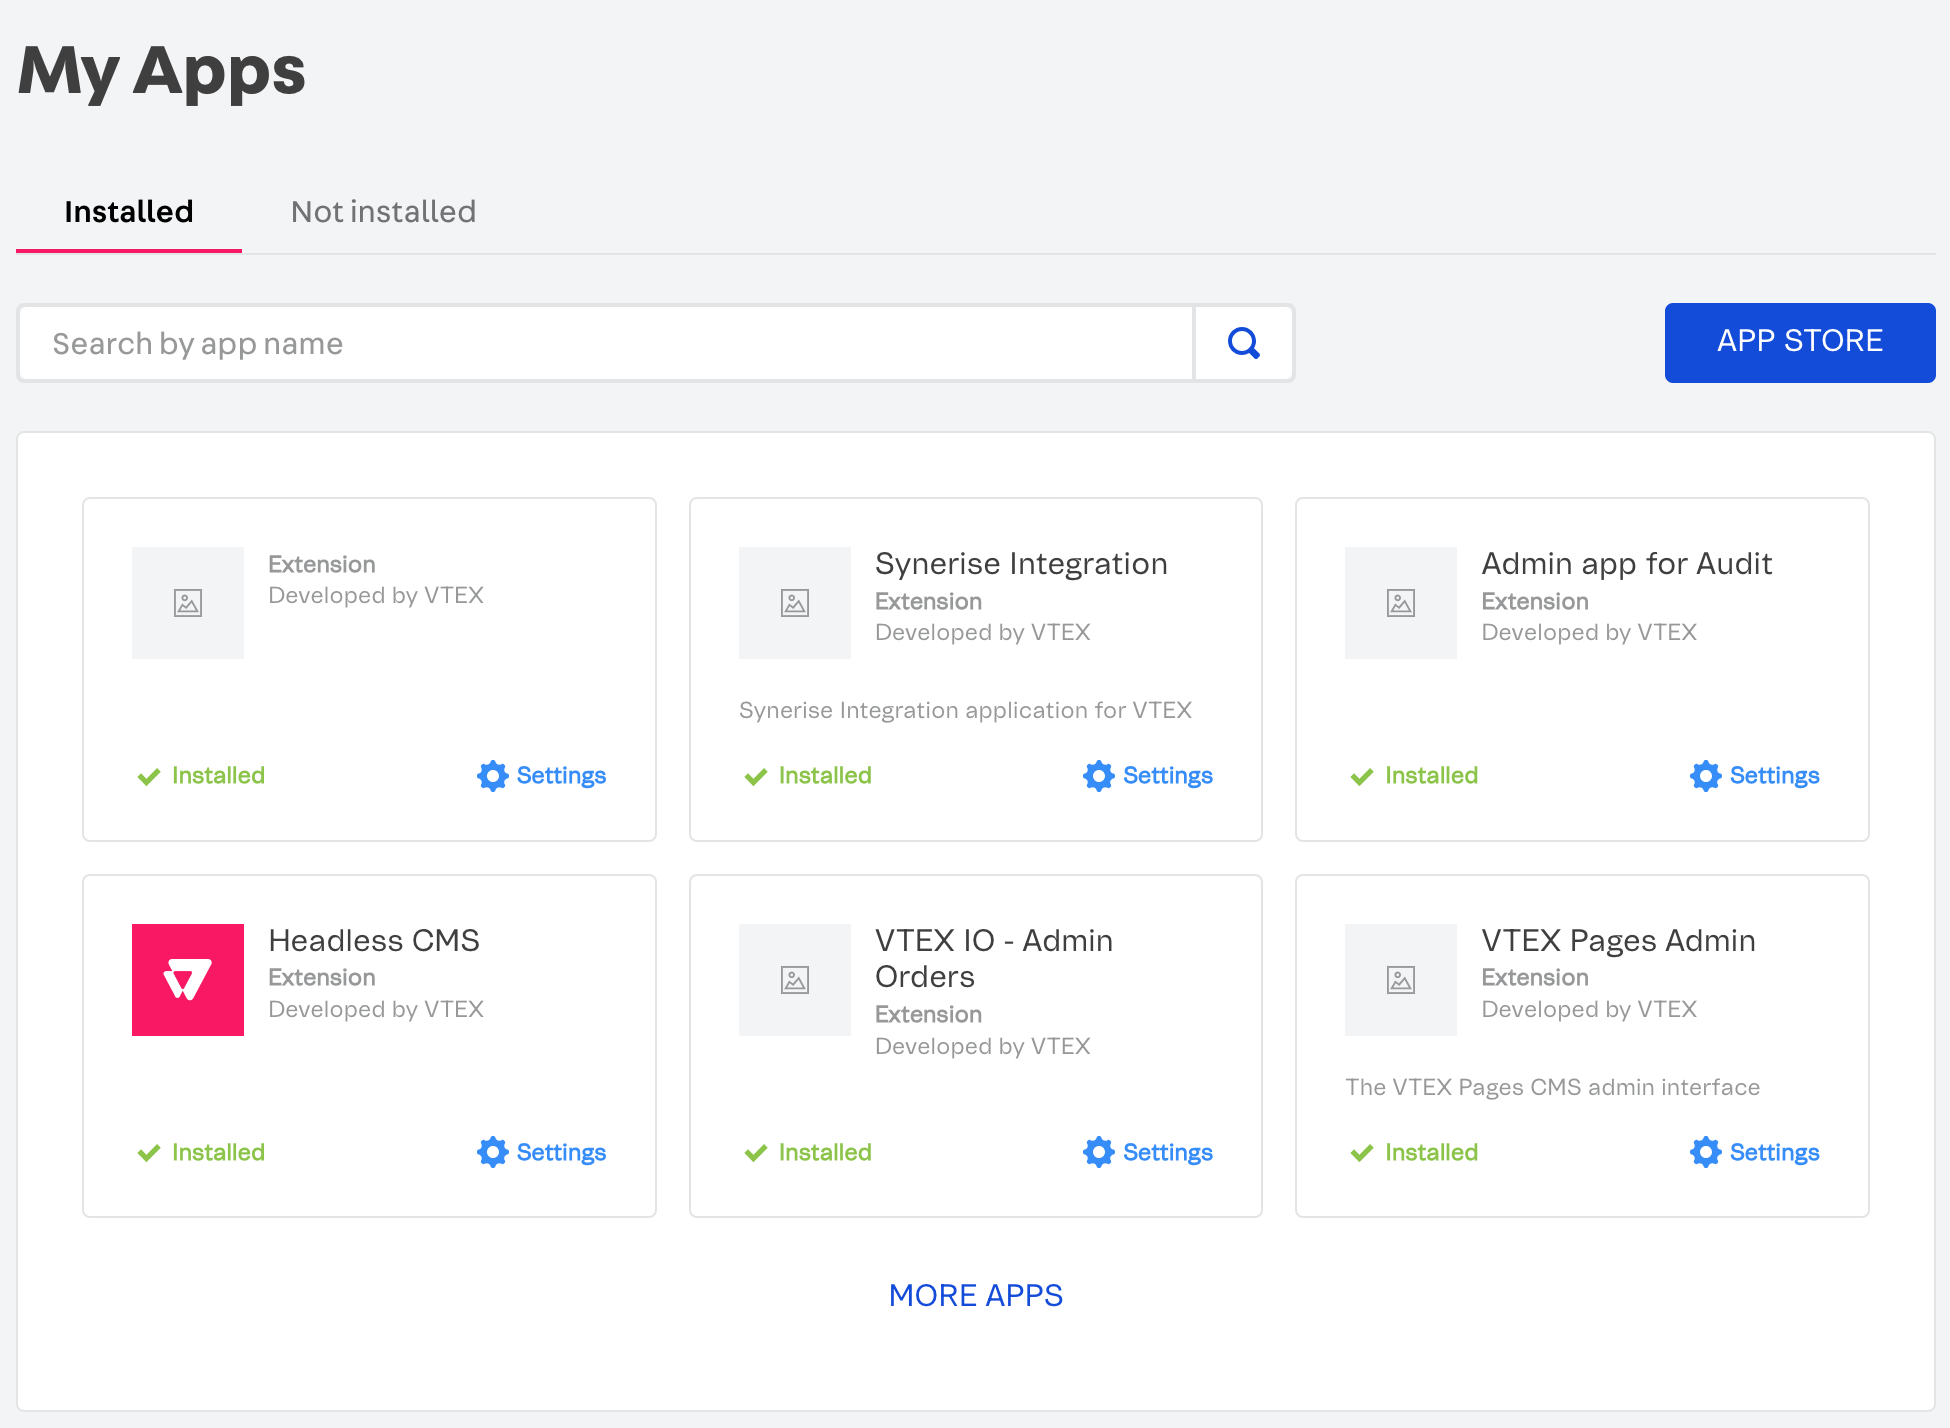
Install the Synerise application with the following command: vtex install synerisepartnerar.synerise-integration Result: A native Synerise integration appears in the Apps section in the menu and you will be redirected to the Configuration section automatically. Synerise integration in the menu in the VTEX panel
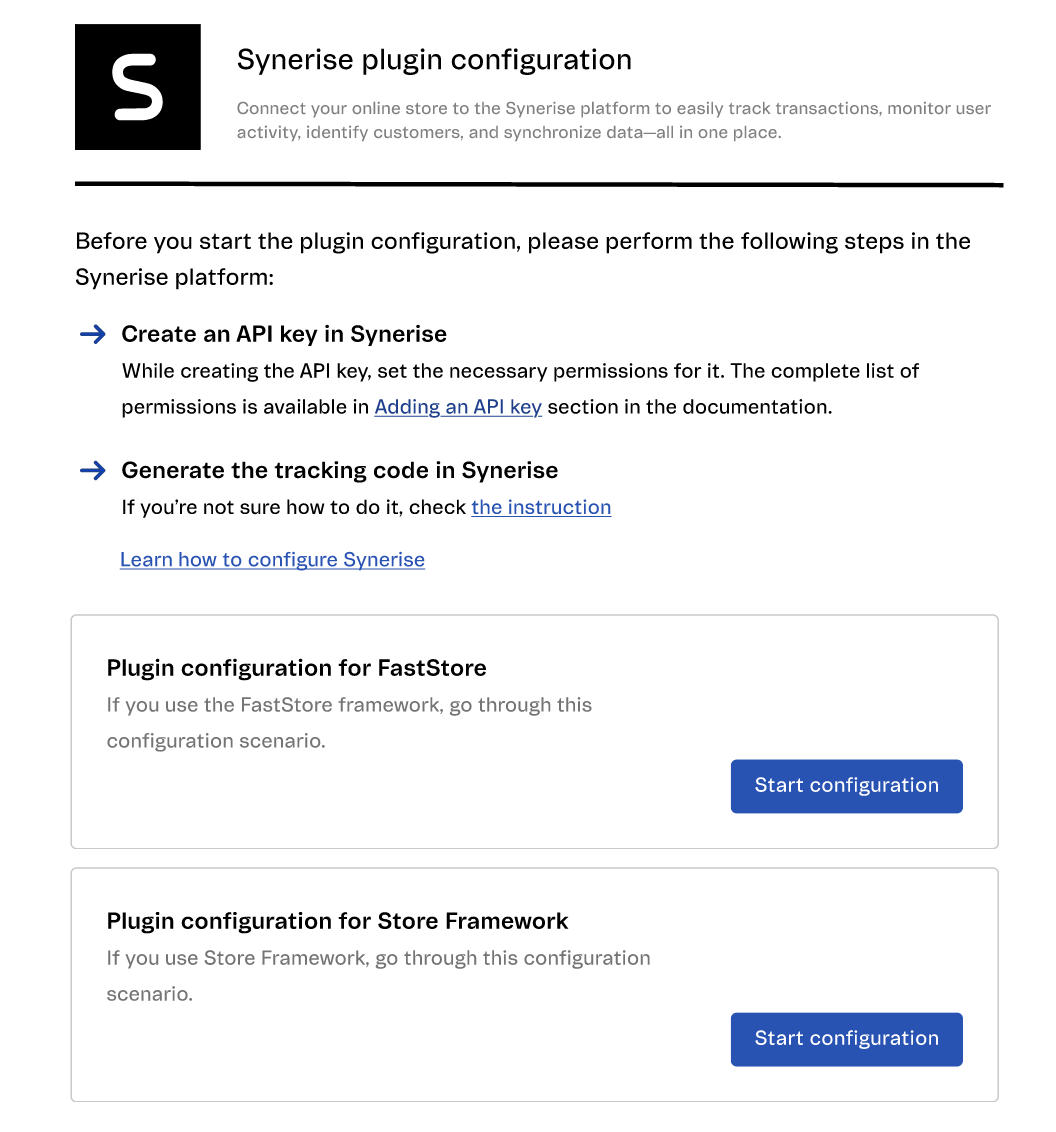
Select the Store Framework plugin configuration
In this part of the process, depending on the framework you use, select the configuration scenario.
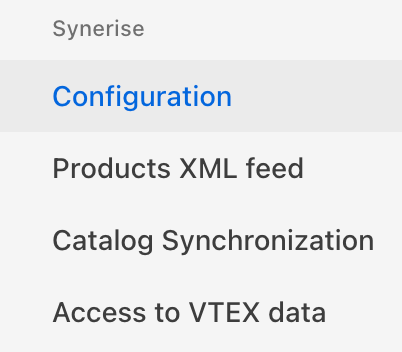
In VTEX, go to Apps > (Synerise) Configuration.
In the Plugin configuration for Store Framework section, click Start configuration.
Selection of the configuration scenario
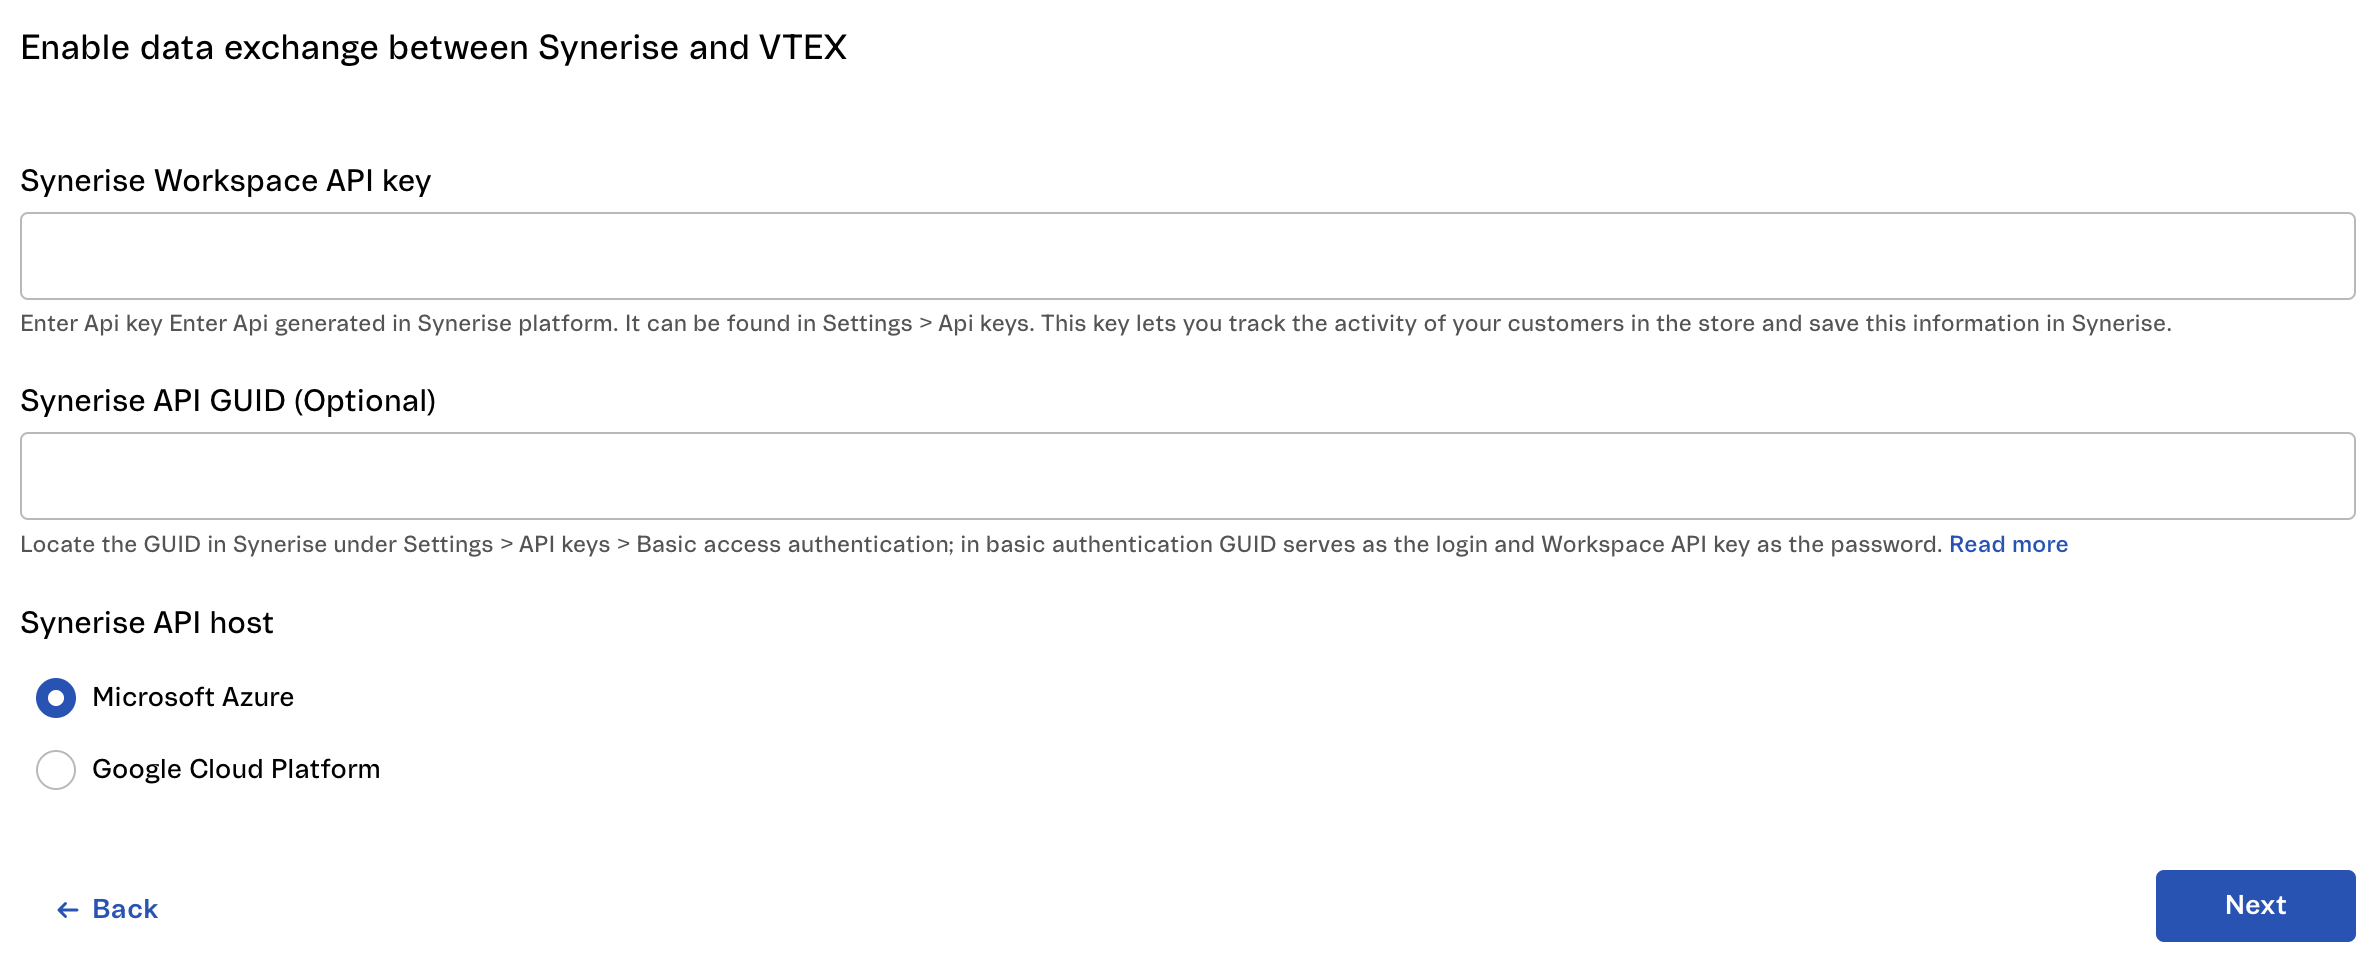
Enable data exchange between Synerise and VTEX
This is the first part of the integration. To initiate the exchange of data between Synerise and VTEX, you will provide the workspace API key, paste the tracking code you generated and declare the scope of customer activities and attributes you want to send to Synerise.
Blank configuration form for enabling data exchange between Synerise and VTEX
In the Synerise Workspace API key field, enter the Synerise API key which you created in "Creating an API Key.
If you want to use basic authentication, in the Synerise API GUID (Optional) field, enter GUID which you can locate in Synerise Settings > API keys > Basic workspace authentication. Filling out this field results in setting GUID to be a password and Workspace API key a login for basic authentication.
From the Synerise API host list, select the API host URL. Depending on the cloud where your Synerise workspace is hosted:
for https://api.synerise.com, use Microsoft Azure
for https://api.geb.synerise.com, use Google Cloud Platform
If you don't know where your workspace is hosted, you can check by looking at the link you're using to access the Synerise platform.
If it's https://app.synerise.com/login, the workspace is hosted on Microsoft Azure
If it's https://app.azu.synerise.com/login, the workspace is hosted on Microsoft Azure US
If it's https://app.geb.synerise.com/login, the workspace is hosted on Google Cloud Platform
Click Next.
Enable Synerise Web SDK on the store's site
In this part of the configuration, you will enable tracking the customer activity and using other Web SDK features in your store (excluding the checkout page) by pasting the Tracking code for VTEX store page you generated in "Generating the tracking code".
Blank configuration form for enabling Synerise Web SDK on the store site
In the Tracker code field, paste the Tracking code for the VTEX store page tracking code you created in this part of the process. Tracking codes generated for VTEX domain
This is a custom event; it is generated when a logged-in customer submits a product review.
If VTEX allows syncing reviews from anonymous customers, no events will be generated in Synerise due to the lack of customer identifiers needed to match reviews with customers.
From the Order statuses for data updates dropdown list, select the status or statuses that will update the transaction information in Synerise. As a result, the existing transaction.charge and product.buy events generated by that order will be updated. Refer to the tables below to see which parameters are overwritten:
product.buy
Event parameter
Explanation
$quantity
- When an item is removed, the value of the parameter is set to 0. - When the item quantity changes, the value changes accordingly.
canceled
This parameter is added only when an item is removed. The value is set to true.
transaction.charge
event parameter
description
$revenue
The total value of the transaction may change (for example, as a result of including promotions or removal of items from the order).
status
Contains the name of the order status which triggered overwriting this event.
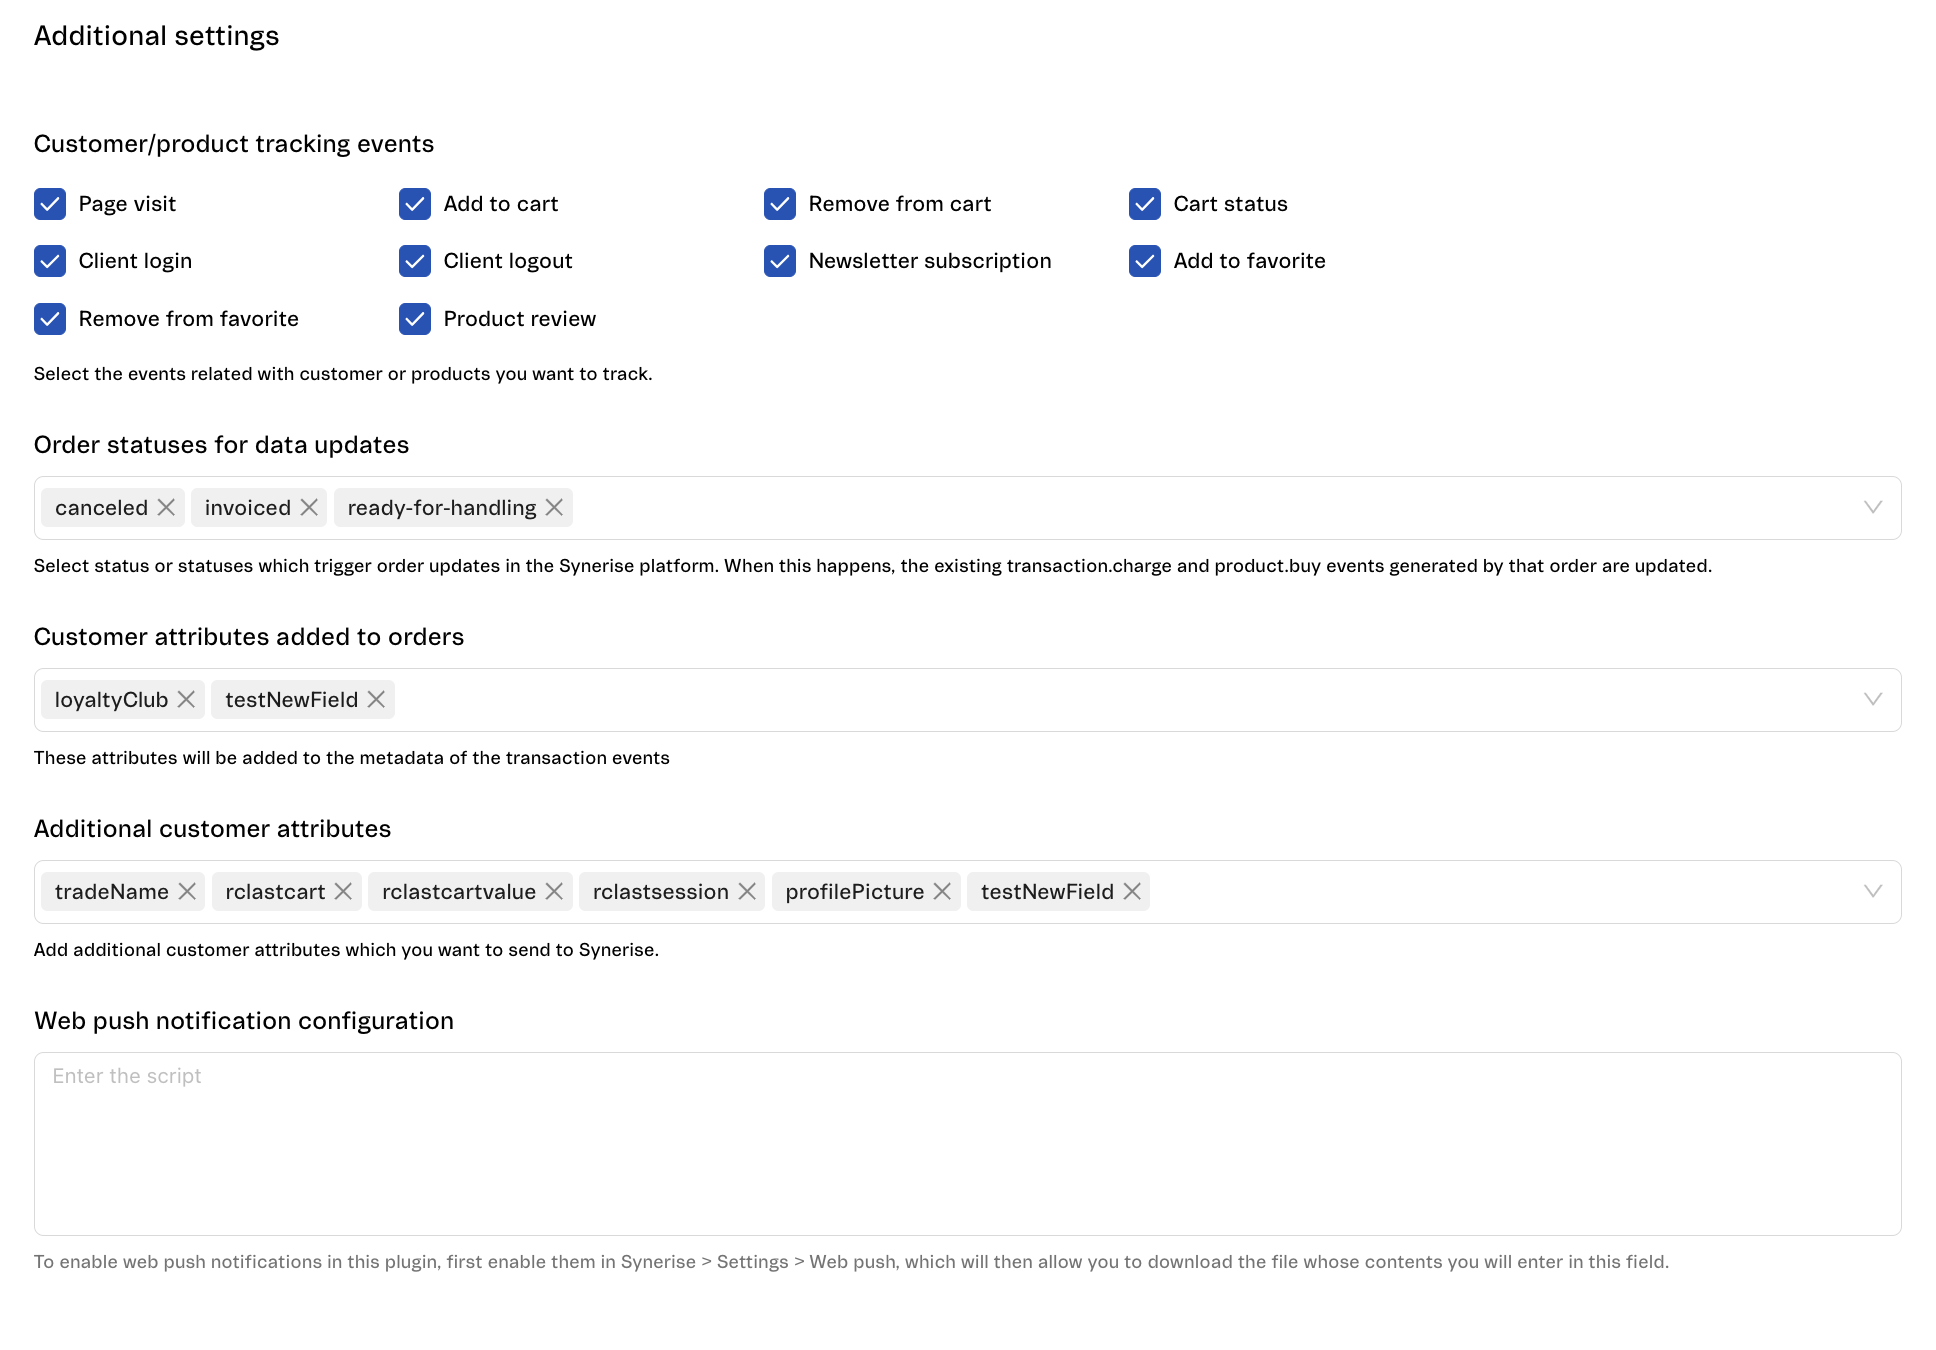
Selecting customer attributes added to orders
In the Customer attributes added to orders field, you can add customer attributes which will be added to the metadata of the transaction events.
Selecting additional customer attributes
In the Additional customer attributes field, select the VTEX attributes which will be sent to the Synerise. These attributes will be saved in the customer's profile.
Customer attributes will be saved on the card of a customer in the customer information panel in Synerise
Configuring web push notifications
If you want to implement web push notifications in your shop, you must first configure them in Synerise. You can find instructions how to do it in "Setting up web push notifications" section in this document. If you already have done it, perform the steps below:
In the upper right corner, click Save. Result: You are redirected to the summary of the plugin configuration.
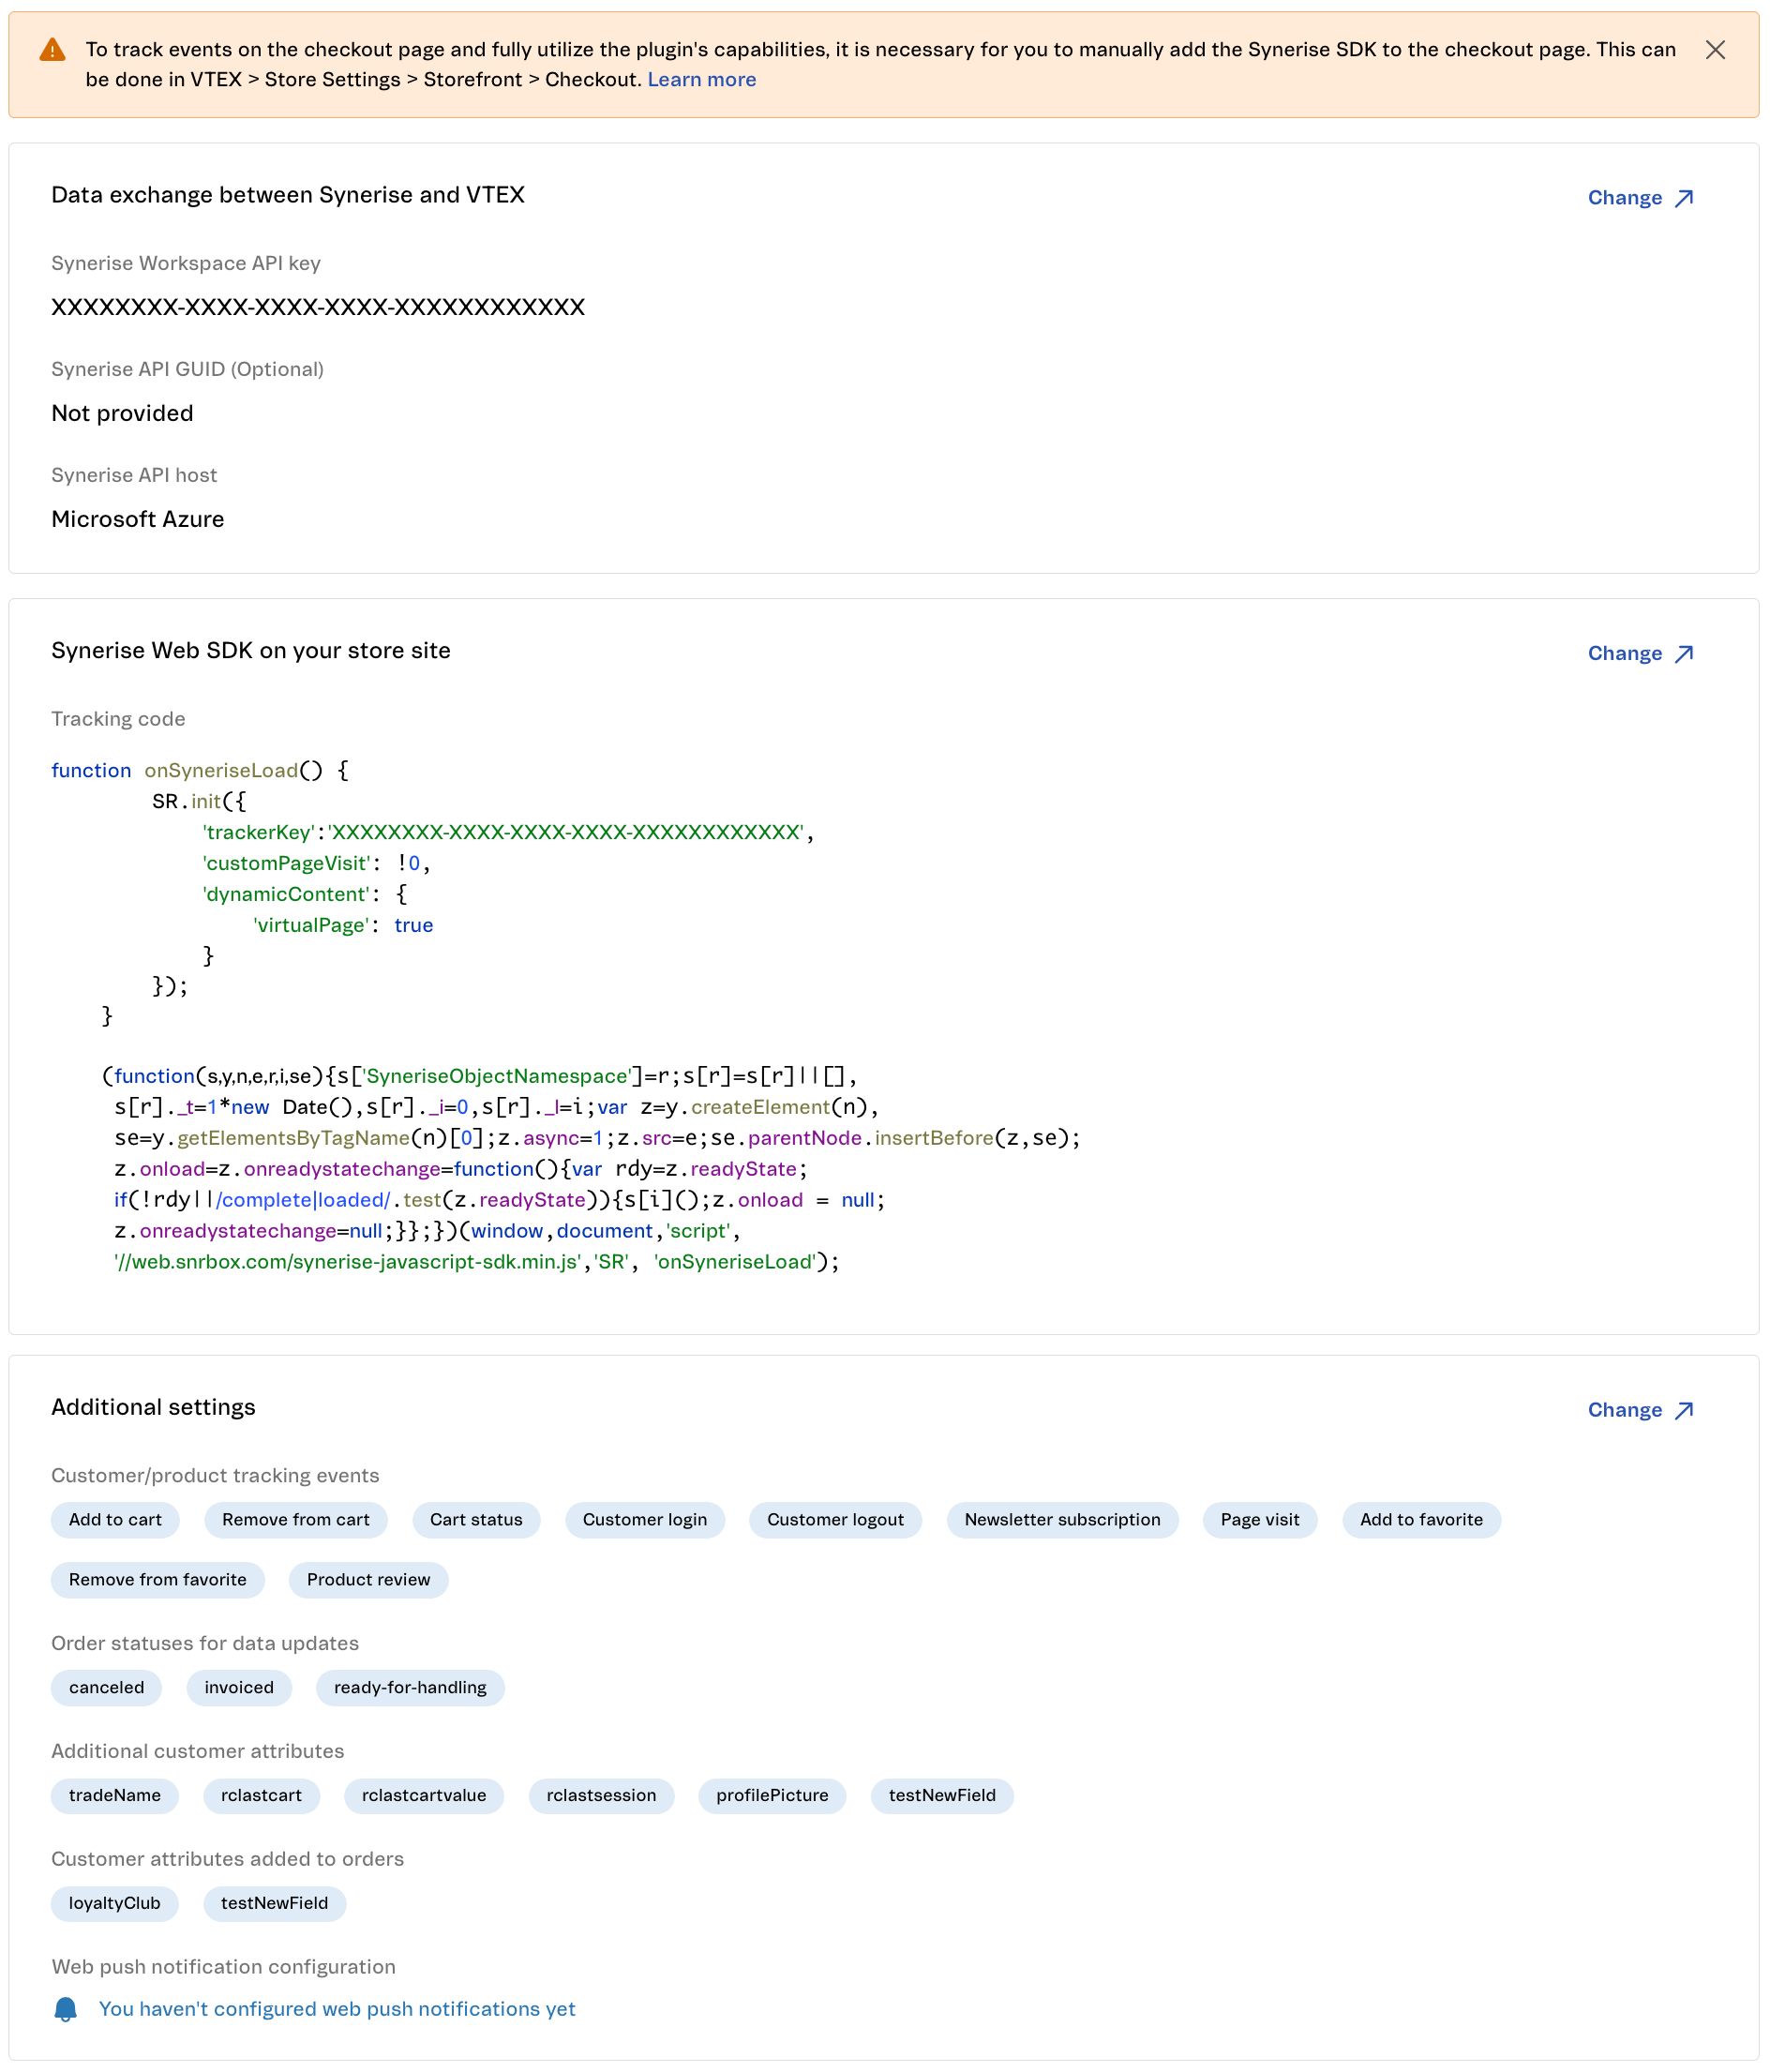
Review summary of configuration
At this stage, you are already tracking the activity of your customers on your website and these data are sent to Synerise, however tracking on the checkout page is still disabled. You can find instructions how enable it in "Enable Synerise Web SDK on the checkout page" section in this document.
After you enable tracking on the checkout page, the warning from the configuration summary will not disappear. You have to close it yourself.
Summary of the settings in the Configuration section
Synchronizing VTEX item feed with the Synerise item feed
Synchronizing feeds lets you keep your product base up to date both in VTEX and Synerise.
If you want to export historical information about orders and customers from VTEX to Synerise, you can use the Synchronization feature. It lets Synerise access the VTEX database and fetch data about customers and transactions.
Some customer attributes are sent by default. You can add custom attributes. For details, see "Attributes sent to Synerise".
If the phone number or email are incorrect, the profile is not created or updated at all. If multiple profiles are created/updated as part synchronizing historical data, only the profiles with errors are skipped.
The phone number must match the following regular expression:
(^\+[0-9 \-()/]{6,19}$)|(^[0-9 \-()/]{6,20}$)
The email must match the following regular expression:
After exporting data to Synerise, you can use it to train AI models, build analytics, create communication campaigns, and more.
Synchronization is a one-time transfer, usually used for historical data. Continuous connection (event tracking, transaction tracking, customer data updates) for exchanging new data is achieved by completing the integration as described in "Pre-configuration in Synerise" and "Configuration in VTEX".
Each exported transaction is saved in Synerise as a transaction.charge event and a number of related product.buy events. Exported customers are saved as profiles. If a transaction or profile already exists in Synerise and the synchronization contains new data, the transaction or profile is updated.
Create a role
You must first create a role which allows for sending historical data to Synerise.
In your VTEX workspace, create a role with a set of permissions required for historical imports:
Go to Account settings > User roles > New role.
Select the following permissions for Product:
OMS
Notify payment
Notify invoice
View order
Notify refund
Order feed subscription
View store sales stats
Feed v3 and Hook Admin
Feed v3 and Hook view only
Subscription view only
Subscription metrics and reports
List Orders
Dynamic Storage
Full access to all documents
Insert or update document (not remove)
List data entity
Create data entity
Remove data entity
View data entity details
CMS
CMS GraphQL API
Pricing
Read prices
Read trade policy configurations
Search
General Settings
Schedule synchronization
In your VTEX workspace, go to Apps > (Synerise) Access to VTEX.
If this is the first time that you're accessing this feature, you are asked to allow Synerise access to VTEX API. To do so:
In a new browser tab, open your VTEX admin panel.
Generate an internal application key and token as described in VTEX documentation.
When you generate the token, copy it immediately. It won't be accessible later.
Paste values from step 2 in VTEX API key and VTEX app token, respectively.
Return to the tab where you need to enter the app key and token in the Synerise plugin.
Paste the key and token into the corresponding fields.
Click Save.
If you want to synchronize marketing consents:
Enable the marketing consent toggle. This works in both directions; any changes in marketing consent in either Synerise or VTEX will be synchronized.
To create a new user who doesn't exist in VTEX database, but exists already in Synerise, select the Adding new users while synchronizing marketing consents checkbox.
Select the Synchronization tab.
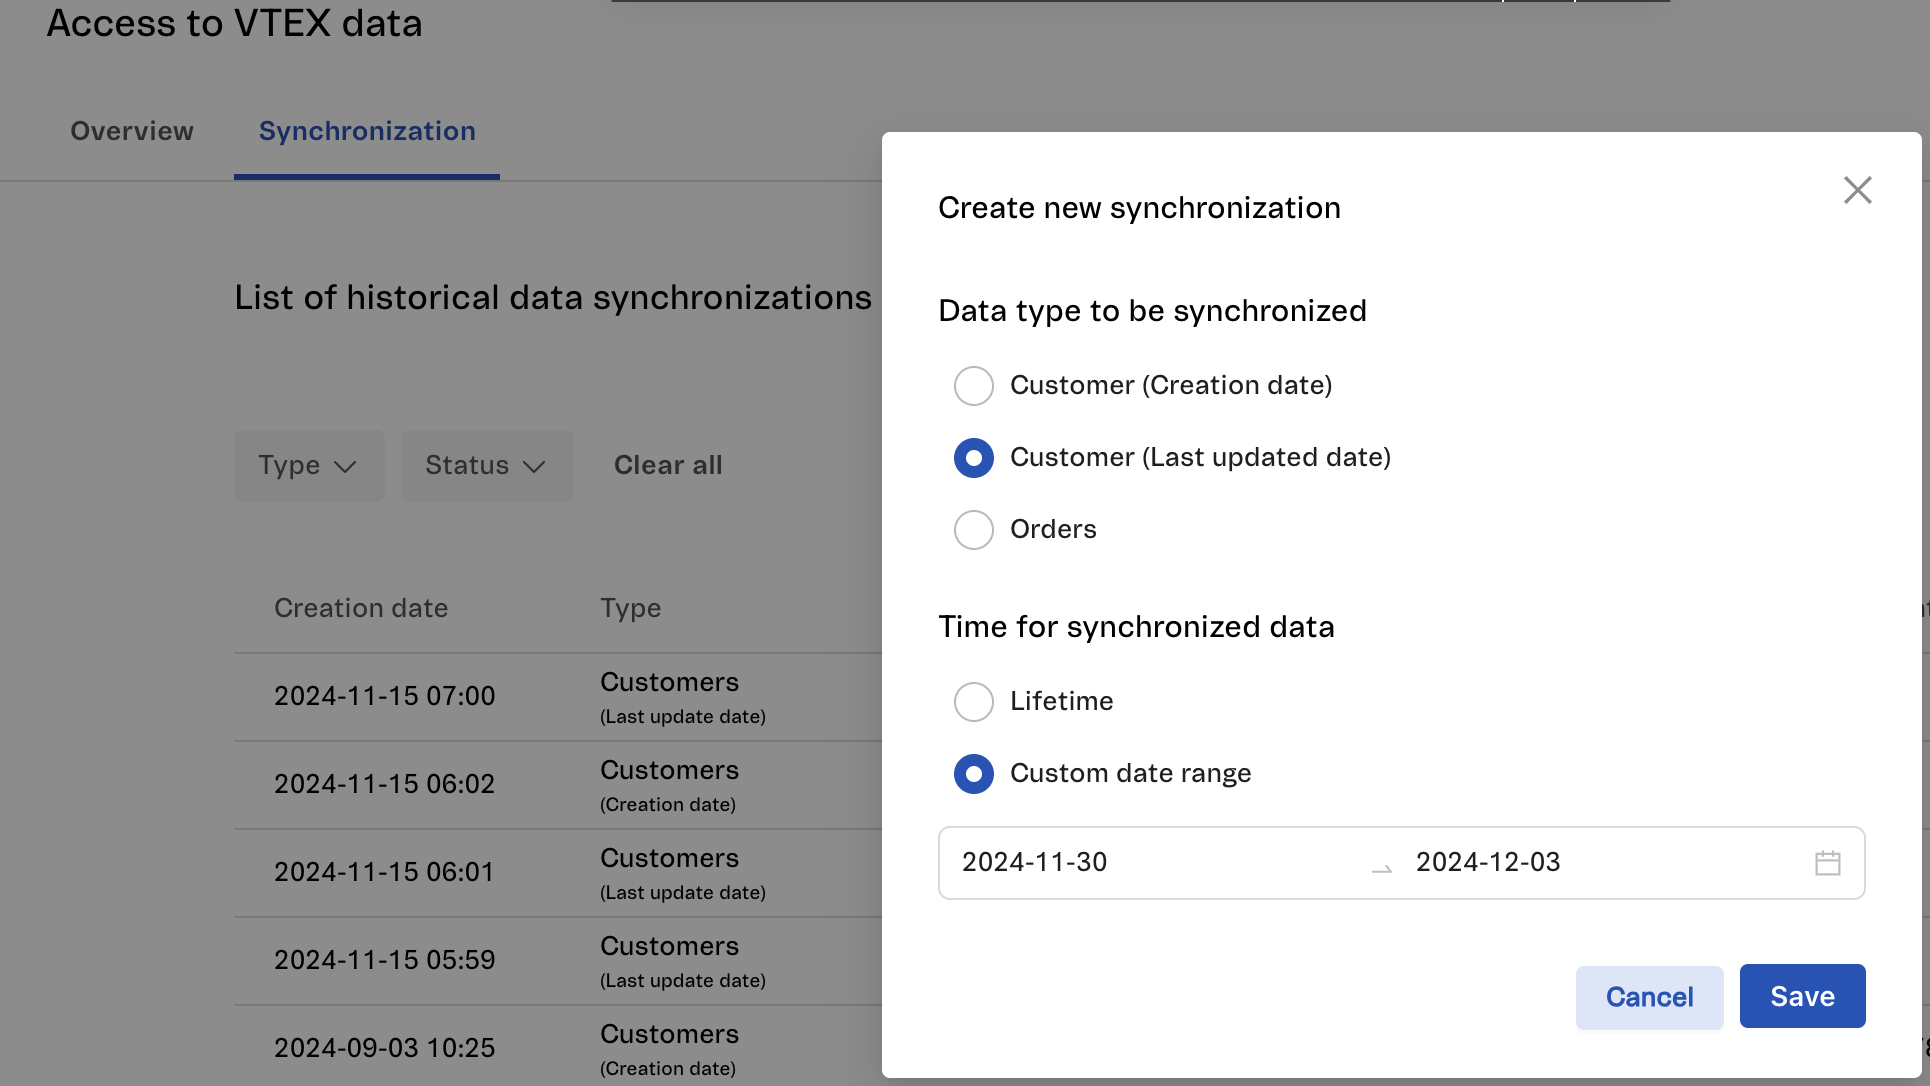
Click New synchronization. There is a limit of 2 active synchronizations.
In the pop-up that opens:
Select the scope of data to be exported:
Customer (Creation date) - Exports data about customers whose accounts were created in a specific time range (you will select the dates in the next step).
Customer (Last updated date) - Exports data about customers whose accounts were updated in a specific time range (you will select the dates in the next step).
Orders - Exports data about transactions and creates/updates transaction.charge and product.buy events.
Select the date range for the export. For example, if in the previous step you selected Customer (Creation date), the data of customers whose profiles were created within the chosen date range will be exported.
Scheduling synchronization
Click Save.
Result: The transfer starts. You can check its progress in the Status column on the list of synchronizations.
Optional
Enable sending transaction updates for sub-accounts
If you use multistore and you want to send transaction updates to Synerise from each subaccount, follow these instructions:
Go to the main VTEX account.
Go to Apps > App Management.
Search for Orders Broadcast IO and open its settings
If you store marketing agreements outside Synerise, it is necessary to configure a separate webhook for updating the status of these agreements in the database where you keep them.
Attributes sent to Synerise
The following table lists the customer data that is sent to Synerise.
If the phone number or email are incorrect, the profile is not created or updated at all. If multiple profiles are created/updated as part synchronizing historical data, only the profiles with errors are skipped.
The phone number must match the following regular expression:
(^\+[0-9 \-()/]{6,19}$)|(^[0-9 \-()/]{6,20}$)
The email must match the following regular expression:
1The numbers are checked in the listed order. The first non-empty one is saved in Synerise.
Sending custom attributes
If you want to send additional customer attributes:
In your VTEX workspace, go to Stores > (Synerise) Settings.
Open the Data tab.
In the Customer attributes selector, from the dropdown, select the additional attributes that you want to send to Synerise.
Click Save settings.
Customer created an account
In the VTEX workspace, go to Store Settings > Master Data. You can find the Master Data section using the search box.
Click the Advanced settings tab.
On the left Settings menu, select Data structure. Result: You are redirected to the following URL: https://{account}.ds.vtexcrm.com.br/; account is replaced with the name of your store.
Select the method of authentication.
After you have been authenticated, select the Trigger tab.
From the Action dropdown list, select Send an HTTP request.
In the Name field, enter a meaningful name of the trigger (for example, "Create customer").
From the Data Entity dropdown list, select Customer.
Set the Status option to Enabled.
In the Rules tab, from the Trigger rule dropdown list, select A record is created.
In the Schedule tab, select Run ASAP.
In the If Positive tab:
In the URL field, type the endpoint: https://yourshopsubdomain.myvtex.com/_v/private/synerise/triggers/customer Replace yourshopsubdomain with your shop's subdomain.
As the method, select POST.
In the headers, add x-synerise-api-key with your API key as the value.
In the request body, enter the following code:
{
   "id":"{!id}"
}
where {!id} will automatically be replaced with the ID of the record.
Click Save.
Customer updated the account
In the VTEX workspace, go to Store Settings > Master Data. You can find the Master Data section using the search box.
Click the Advanced settings tab.
On the left Settings menu, select Data structure. Result: You are redirected to the following URL: https://{account}.ds.vtexcrm.com.br/; account is replaced with the name of your store.
Select the method of authentication.
After you have been authenticated, select the Trigger tab.
From the Action dropdown list, select Send an HTTP request.
In the Name field, enter a meaningful name of the trigger (for example, "Update customer").
From the Data Entity dropdown list, select Customer.
Set the Status option to Enabled.
In the Rules tab, from the Trigger rule dropdown list, select A record is changed.
In the Schedule tab, select Run ASAP.
In the If Positive tab:
In the URL field, type the endpoint: https://yourshopsubdomain.myvtex.com/_v/private/synerise/triggers/customer Replace yourshopsubdomain with your shop's subdomain.
As the method, select PATCH.
In the headers, enter the x-synerise-api-key parameters and as a value your API key.
In the request body, enter the following code:
{
   "id":"{!id}"
}
where {!id} will automatically be replaced with the ID of the record.
Click Save.
Customer account has been deleted
In the VTEX workspace, go to Store Settings > Master Data. You can find the Master Data section using the search box.
Click the Advanced settings tab.
On the left Settings menu, select Data structure. Result: You are redirected to the following URL: https://{account}.ds.vtexcrm.com.br/; account is replaced with the name of your store.
Select the method of authentication.
After you have been authenticated, select the Trigger tab.
From the Action dropdown list, select Send an HTTP request.
In the Name field, enter a meaningful name of the trigger (for example, "Delete customer").
From the Data Entity dropdown list, select Customer.
Set the Status option to Enabled.
In the Rules tab, from the Trigger rule dropdown list, select A record is deleted.
In the Schedule tab, select Run ASAP.
In the If Positive tab:
In the URL field, type the endpoint: https://yourshopsubdomain.myvtex.com/_v/private/synerise/triggers/customer Replace yourshopsubdomain with your shop's subdomain.
As the method, select DELETE.
In the headers, enter the x-synerise-api-key parameters and as a value your API key.
In the request body, enter the following code:
{
   "email":"{!email}",
   "userId": "{!userId}"
}
where {!email} and {!userId} will automatically be replaced with the email of the customer and the ID of a customer respectively. In Synerise, userId is the equivalent of customId.
Click Save.
Enable Synerise Web SDK on the checkout page
The checkout page in VTEX requires a custom script to enable Synerise tracker and SDK. You can implement it in one of the following ways (the choice of the method depends on your checkout page configuration in VTEX):
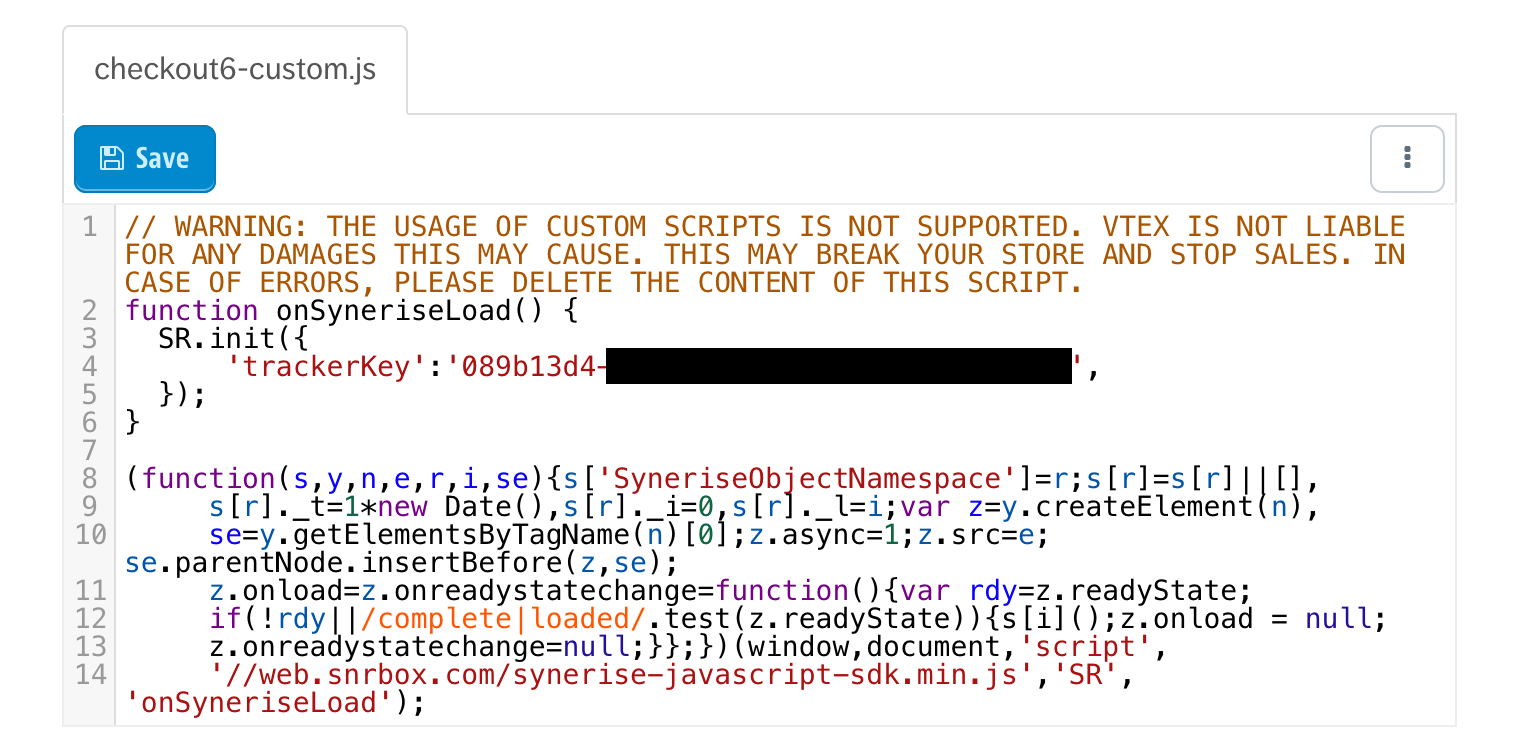
While performing the procedure described in the documentation, in the JavaScript tab, add the Synerise tracking code from "Generating the tracking code" section.
Checkout UI Settings
Follow the instructions in the VTEX documentation described in the Configuration section.
While performing the procedure described in the documentation, in the checkout-ui-custom folder, create a JS file with the Synerise tracking code from "Generating the tracking code" section.
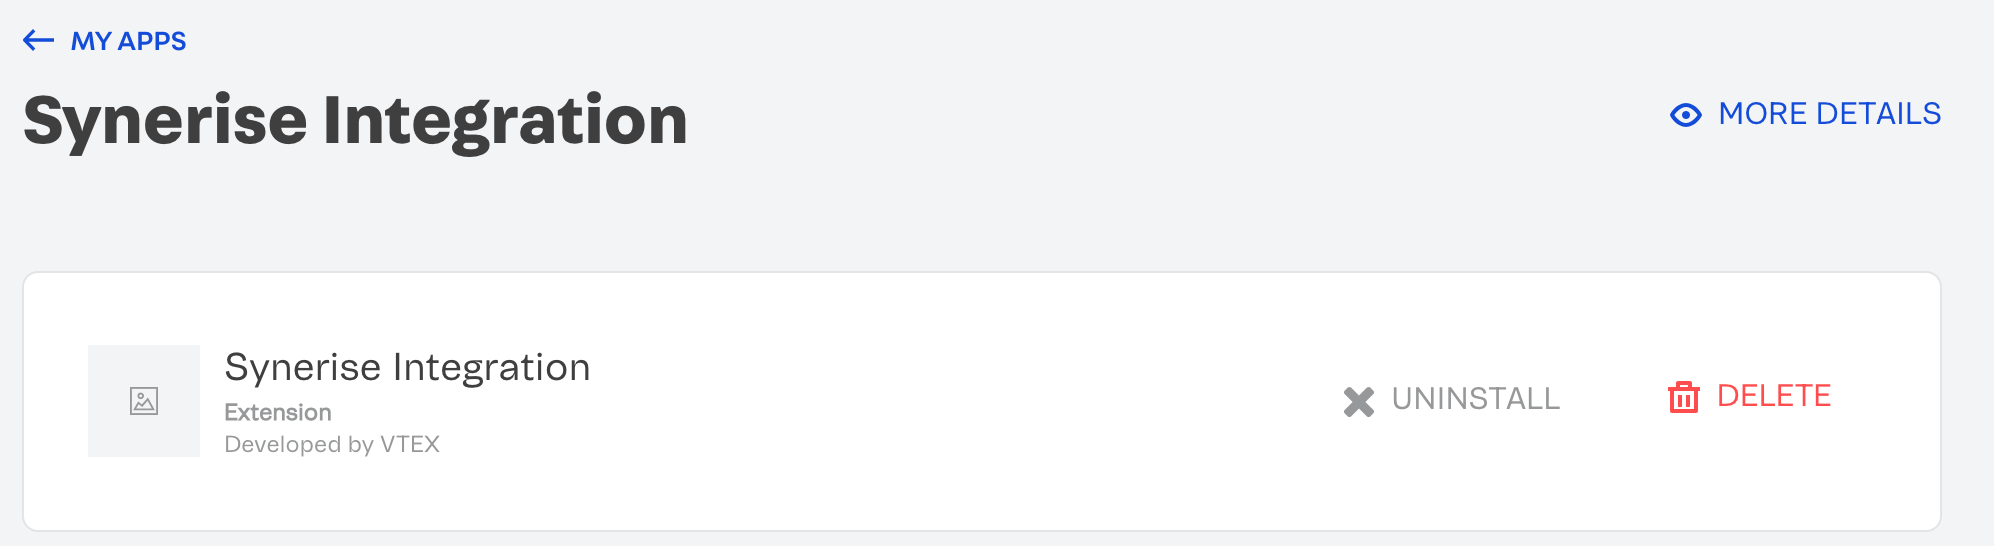
Uninstalling the Synerise plugin
The process of uninstalling the Synerise plugin consists of the following steps:
Update the configuration by sending the edited response as the body of a POST request to the same URL: https://{accountName}.vtexcommercestable.com.br/api/checkout/pvt/configuration/orderForm