The Single Sign-On feature allows you to integrate a third party identity provider and enable single sign-on (SSO). SSO allows a user to authenticate once with your identity provider and then access Synerise or other enabled service providers, without the necessity to authenticate with each of those applications separately.
Synerise provides Security Assertion Markup Language (SAML) based single sign-on where you can integrate with any identity provider that uses SAML 2.0 protocol, which is a widely-accepted standard for exchanging authentication and authorization data between Synerise and Identity Providers such as Microsoft Azure, Google Workspaces, Okta, and more.
We prepared an instruction for implementing single sign-on with Entra ID. Read more in "Single sign-on with Microsoft Entra ID".
Understanding SAML-based SSO
In order to understand how SAML-based single sign-on works, take a look at the diagram below.
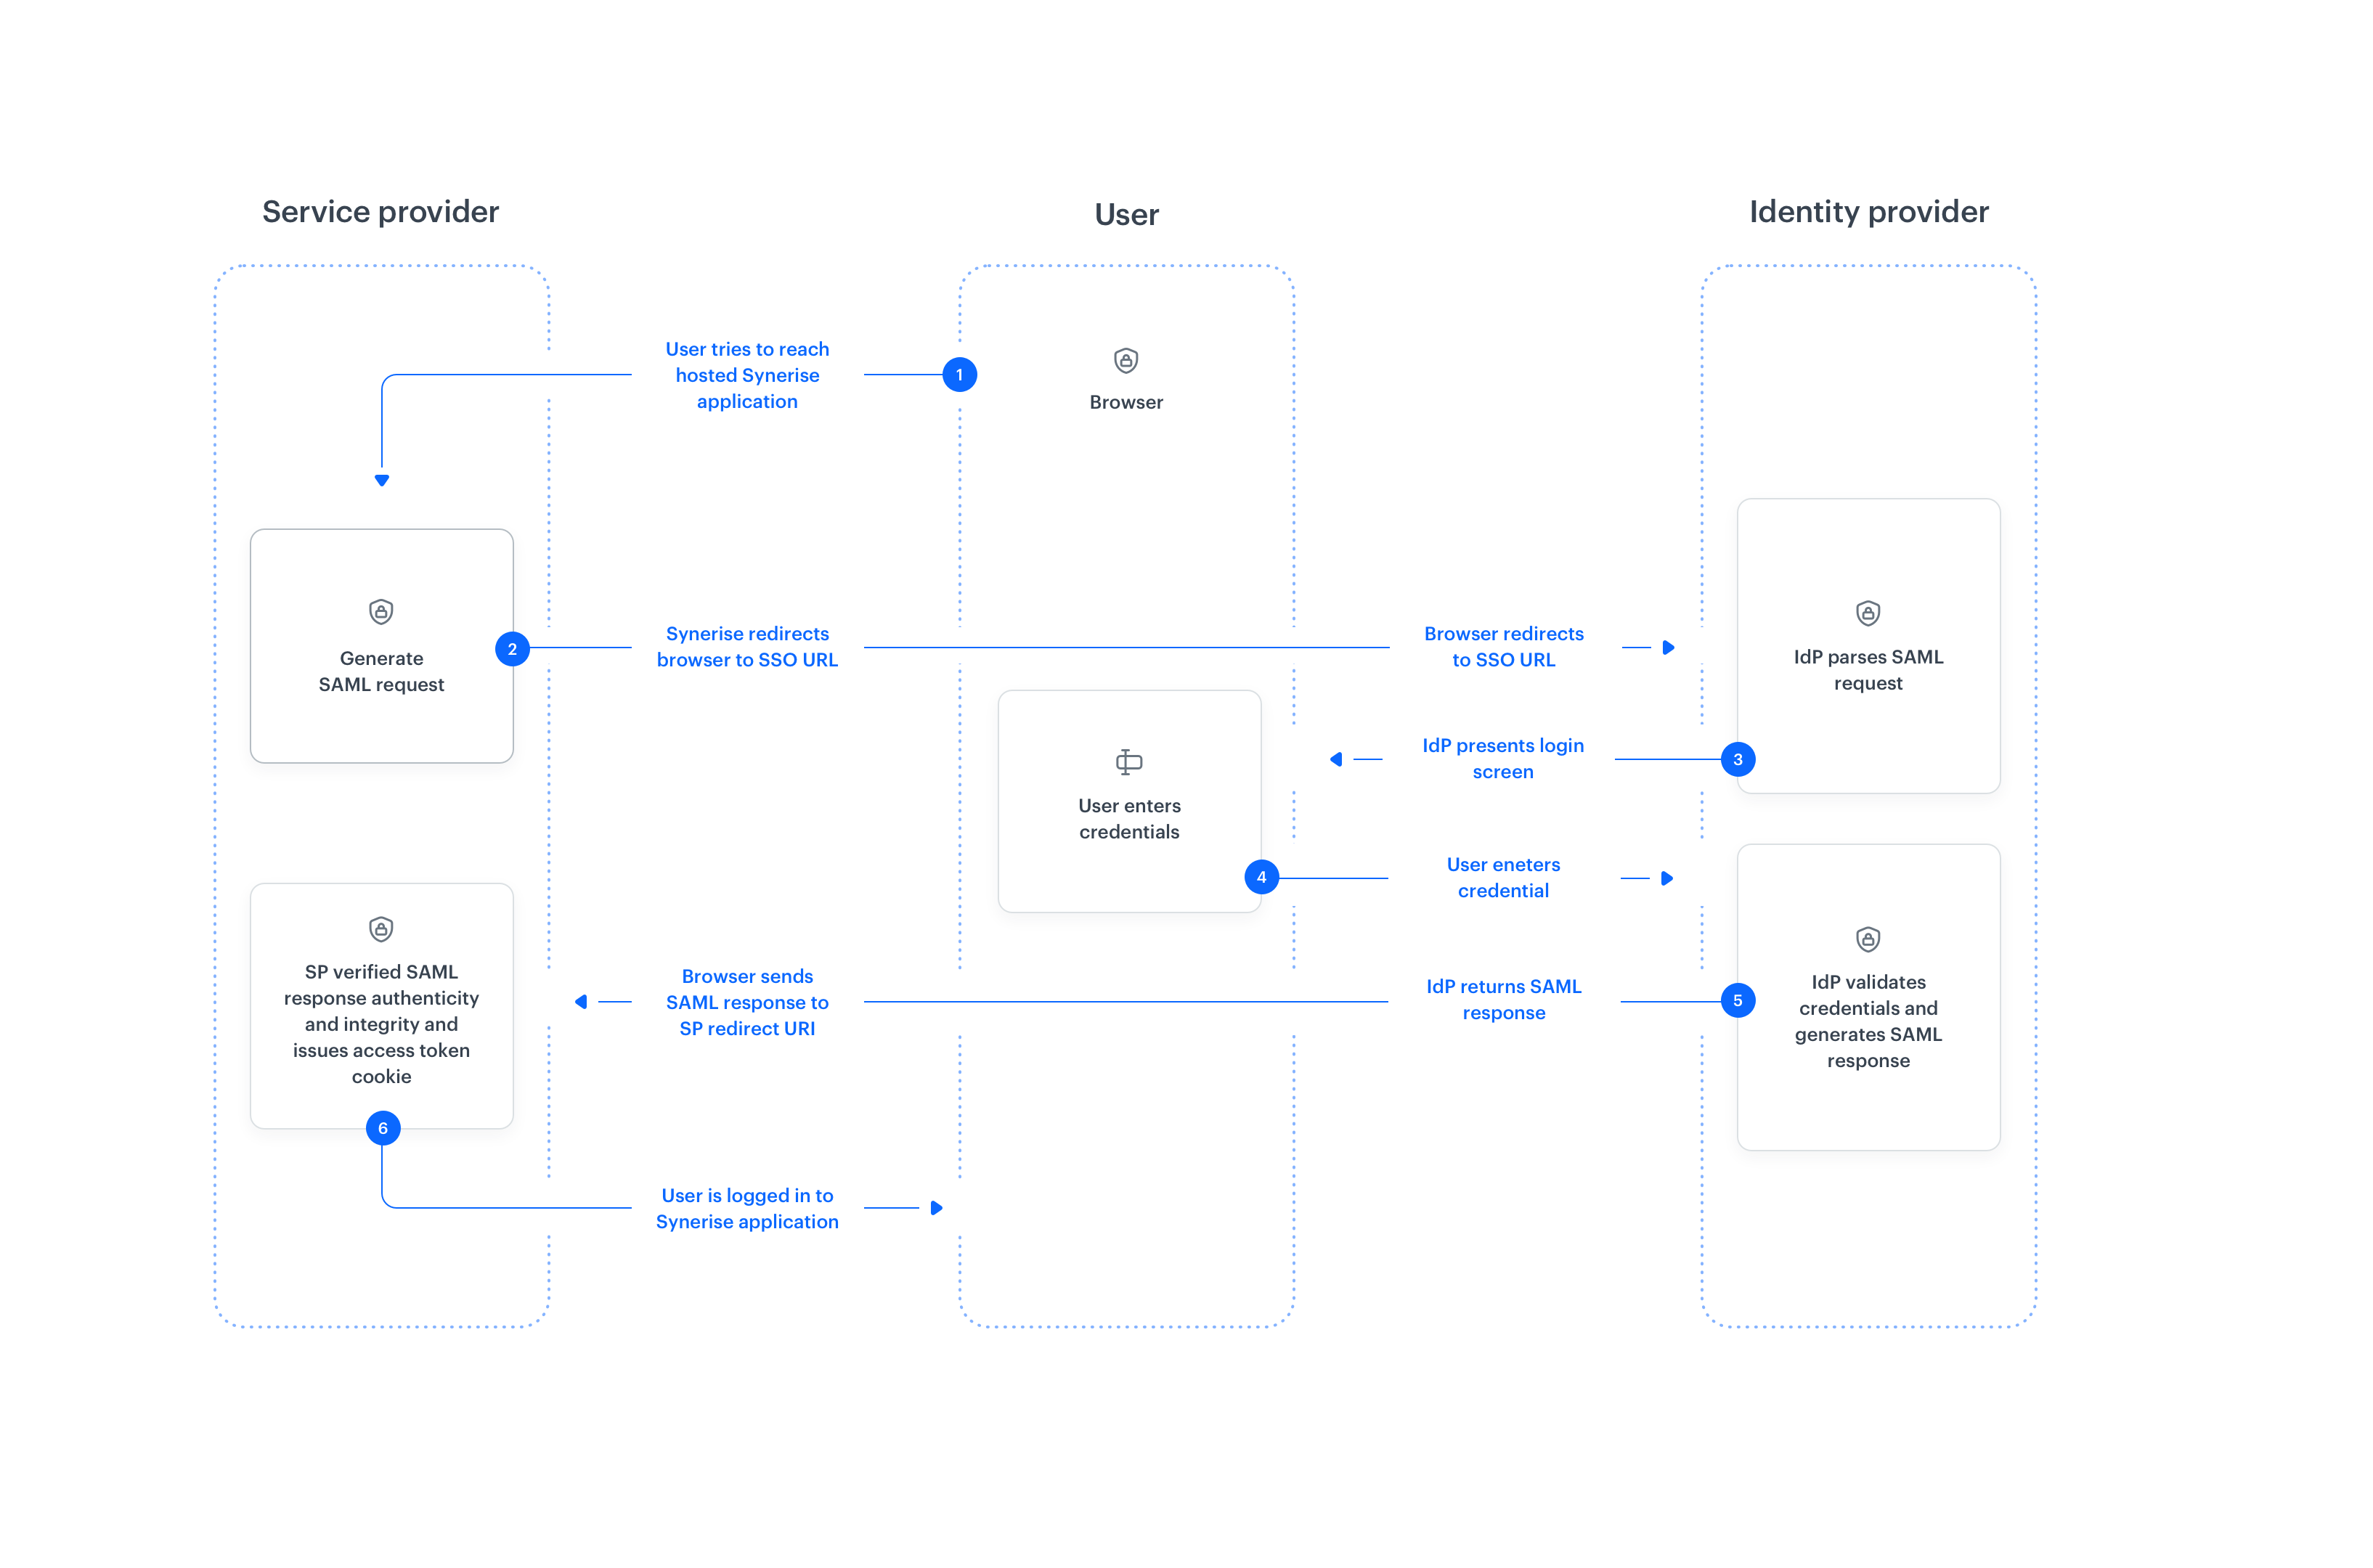
Step 1. As a user, you attempt to access app.synerise.com (service provider) that normally requires login credentials to access it. Assuming you have configured SAML for your profile, it leads you to the identity provider (Step 2).
Step 2. Based on the provided user ID (email), the service provider redirects the user to identity provider's SSO Endpoint with a SAML authentication request (that has been built based on the configuration set for your identity provider in app.synerise.com).
Step 3. Identity provider validates SAML authentication request received from the service provider and presents a user with the identity provider's login form (please note that it may be a password-less authentication for some identity providers, like for example Microsoft Entra ID)
The user may not be presented with the login form if there was already a valid session established previously, and the user is redirected to the application immediately (for example, with a different application using that identity provider).
Step 4. The identity provider generates a SAML response.
Step 5. The SAML response is passed from the user's browser to the service provider's redirect URI.
Step 6. The service provider validates the authenticity and integrity of the response and upon success, it issues access token/cookie, and as a result, the user is signed in to app.synerise.com
Benefits
- Centralized user management - With the identity provider, you get to administer users from one central place in your organization.
- Increased security - The benefit of a single user account in many applications helps to maintain a single identity and credentials, so users don’t have to remember too many credentials. Authentication takes place only with the identity provider, with a single set of security-related policies regardless of the application.
- Improved user experience - Your users only need to sign in once to use multiple applications. This approach ensures faster authentication, saves time and relieves users from remembering multiple credentials.
Good practices
- Remember to have a strong password policy, two-factor authentication, and other security policies configured with your identity provider as the ones available in Synerise won’t apply to regular users.
- Configure password requirements or two-factor authentication for your workspace in Synerise, as it will be enforced for the guest accounts (users that are not managed by you).
Prerequisites
- You must be granted user permissions to access Settings and configure identity provider.
- You must verify the ownership of at least one domain (could be more if needed).
- Create a backup user that won't be using the same email address in the identity provider account. This is not required if you start with the Both methods authentication mode (explained in the Configuration parameters explanation section in this document).
- You must have access to identity provider's admin panel to configure SAML application.
Configuration parameters explanation
The nomenclature of inputs in Synerise and identity provider service or documentation may not overlap.
| Configuration parameter | Description |
|---|---|
General settings |
|
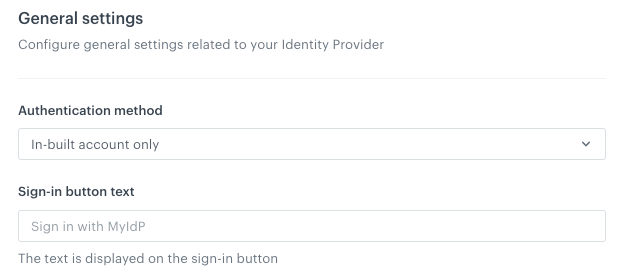
| Authentication method | There are three option to choose from: - In-built account only - It allows to sign in only users who have account in Synerise (logging in with an email address and password). - Identity Provider account only - It allows to sign in only those users who have account in the service of the identity provider. It disables signing in with the Synerise credentials and enforces authentication through your identity provider credentials and enforce authentication through your identity provider. - Both methods - It allows to sign in through two methods simultaneously: either with Synerise credentials or through identity provider account. In the beginning when you’re testing the identity provider authorization, we recommend to enable two options of authorization. |
| Sign-in button text |
The text in this field is displayed on the button to your users. 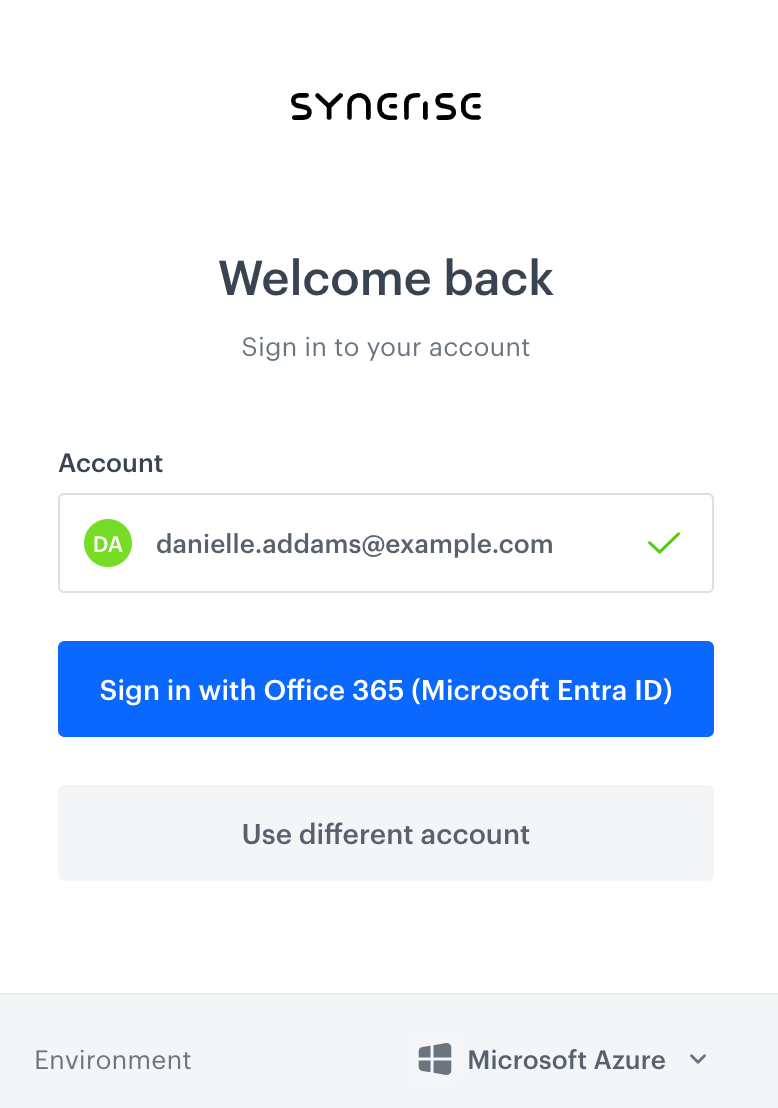
|
Authentication settings |
|
| Managed domains | In this field, select the domains (used in the user's accounts) for which the identity provider authorization is available. The list includes only verified domains (learn how to verify a domain). This option is available only to the verified domains for the security reasons. |
| Attribute containing email address | Identity provider is required to pass the identity attribute of a user who wants to log in to Synerise. This identity attribute is an email address. Each identity provider chooses their own way of passing this attribute. If the identity provider passes a user's email address in other attribute than subject, enable this option. |
| URL of the email attribute | Available when the Attribute containing email address toggle is switched on. Enter the URL of the email attribute. You can find information where to find it in the identity provider's documentation. An exemplary attribute which contains an email address, returned in an authorization response from the identity provider: <Attribute Name="http://example.com/identity/claims/emailaddress”>
<AttributeValue>john.doe@example.org</AttributeValue> |
Just-in-Time Provisioning |
|
| Update user roles while signing in | Configure the method of updating user permissions (it's useful in situations when user permissions are modified between log-ins both in Synerise and identity provider portal): - Full sync - This setting allows you to always enforce user roles based on group or role claims from SAML response provided by your identity provider. Whenever a user authenticates, Synerise overwrites the permissions with the ones sent by the identity provider. Consider that as "replace". - Add missing - When this option is selected, user roles will only be added to the ones that are missing for a user's account, but it won't modify any extra roles that you might have added directly in Synerise. - No - If you choose this option, authentication response won't overwrite user roles and they can only be assigned/modified directly in Synerise |
| Unblock users | This option unblocks users (who blocked themselves by entering a wrong password several times, for example) after the authorization through identity provider. It's particularly useful for Allow signing in with both methods authentication mode. |
| Dynamic role assignment | You can set different user roles for various user groups from the identity provider service. To do so, you must enter the URL of the group attribute, then enter the ID of the group and select a user role. The opposite method is the static role assignment (see next table row), which involves assigning the same user role for everyone authorizing through an identity provider. |
| Roles | It must be selected, when the Dynamic role assignment is disabled. Select a user role assigned to every user who authorizes through an identity provider. |
SAML protocol settings |
|
| Issuer | You can find it in the identity provider's portal or documentation. Expected value type: URL or URN. |
| SSO endpoint | You can find it in the identity provider's portal or documentation. It may be the same as in Issuer. Expected value type: URL. |
| Identity Provider application ID | You can find it in the identity provider's portal. Expected value type: string. |
| Service Provider redirect URI | This field is always filled in by default. It's useful while registering the Synerise application in your identity provider service. |
| Request binding | Define how the requestors and responders communicate by exchanging messages. |
| Response signature verification | You can define where the SAML signature is available. |
| Response validation method | You can select the method of receiving the signature certificate from the identity provider which is required to validate the response. - By selecting the Static option, you must provide a file with the signature certificate. Each time a certificate changes, you must upload it to the Identity Provider Signature Certificate field. - By selecting the Manifest option (recommended), you must provide a URL which contains the signature certificate. When the certificate changes, no actions are required. |
Scenario when the Static option is selected as Response validation method |
|
| Identity Provider Signature Certificate | Upload the file that contains the identity provider certificate which is used to validate the response. It's available either in the identity provider's portal or in their documentation. |
| Maximum clock skew | Define the acceptable time of discrepancy between issuing the authorization by the identity provider and receiving it by Synerise. |
Scenario when the Manifest option is selected as Response validation method |
|
| Manifest URL with certificate | Enter the URL from which the signature certificate can be downloaded. |
| Maximum clock skew | Define the acceptable time of discrepancy between issuing the authorization by the identity provider and receiving it by Synerise. |
Make log-in screen modifications
- Go to
 Settings > Access Control > Single Sign-on (SSO).
 - To define the available login methods and the text on the button:
- From the Authentication mode dropdown list, select one of the available modes:
- In-built account only - Users can only log in with an email address and password.
- Identity Provider account only - User can only log in through the identity provider.
- Both methods - Users can log in with those two methods.
- In the Sign-in button label field, enter the text that is displayed on the button in the Synerise log-in window for the identity provider authentication method.
- From the Authentication mode dropdown list, select one of the available modes:
Define authentication settings
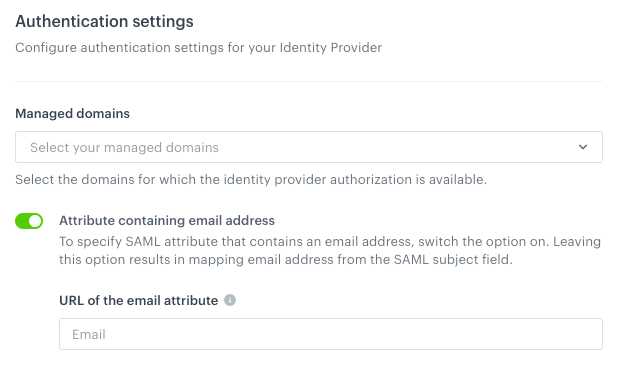
To define the domains for which this authentication method is enabled and how the email attribute is passed to Synerise, in the Authentication settings section:
In the Managed domains field, select verified domains for which this authentication method is available.
If you want to include all verified domains, you must select them all in the field - domain verification itself does not automatically enable this method of authentication.
- If the identity provider passes a user's email address in other attribute than
subject, switch the UAttribute containing email address toggle on.
Result: An Identity Provider email attribute field appears. - In the Identity Provider email attribute field, enter the URL of the email attribute.
You can find it in the XML file generated while registering Synerise application in your identity provider portal or you can find it in the identity provider documentation.
Define permissions for users who authorize by identity provider
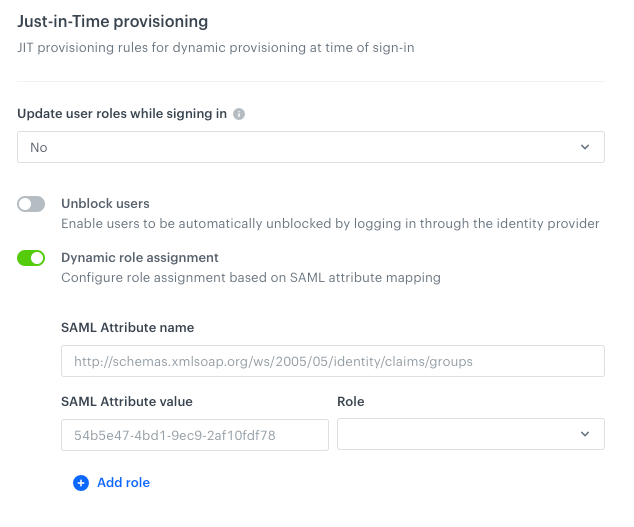
- To define user's permissions when they authenticate, in the Just-in-Time provisioning section:
From the Update user roles while signing in dropdown list, select the method of updating user roles (it's useful in situations when user permissions are modified between log-ins both in Synerise and identity provider portal):
Explanation of every option is available in the Configuration parameters explanation table.
- Full sync
- Add missing
- No
- To enable unblocking Synerise users by identity provider authorization, switch the Unblock users toggle on.
Result: If a user is blocked in Synerise, the identity provider authorization unblocks this user. Define how you want to assign user permissions for users authorizing by Identity Provider:
To enable static role assignment (every user receives the same user permissions), from the Role dropdown list, select a Synerise user role.
- To enable dynamic assignment of user permissions through SAML mapping, switch the Dynamic role assignment toggle on.
Result: Three text fields appear.In the SAML Attribute name field, enter the identity provider's group attribute.
You can find it in the identity provider portal or documentation.
- In the SAML Attribute value field, enter the value of the attribute.
You can find it in the identity provider portal or documentation.
- From the Role dropdown, select a user role for the attribute.
- To add more attributes and assign roles to them, click Add and repeat steps I-III.
- To enable dynamic assignment of user permissions through SAML mapping, switch the Dynamic role assignment toggle on.
Adjust SAML protocol settings
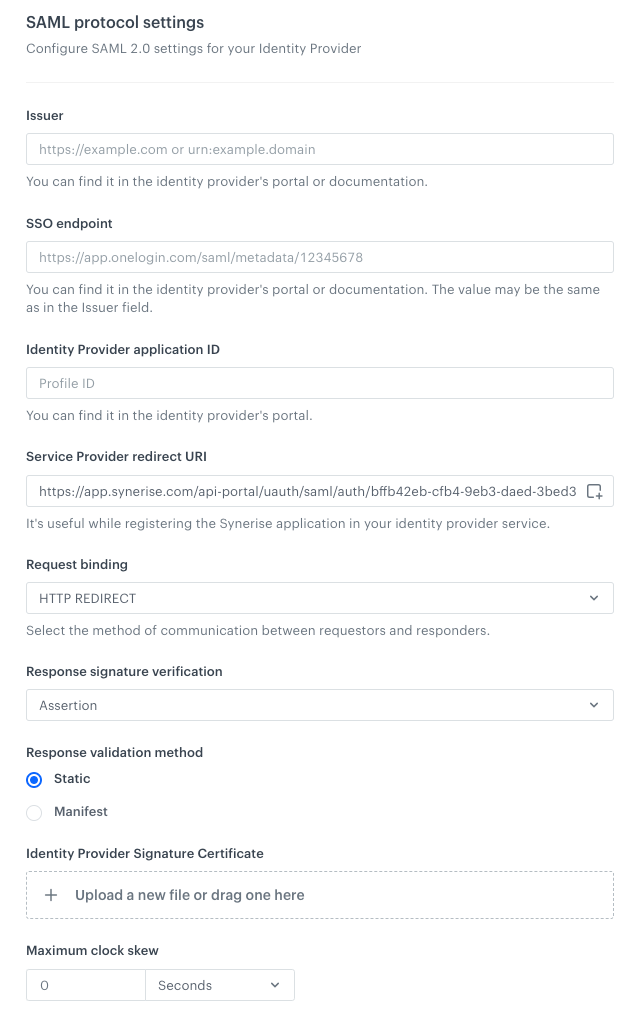
- To set up SAML-based single sign-on, the identity provider and service provider must establish trust with each other. Proceed to the SAML protocol settings section.
- In the Issuer field, enter the URL or URN (you can find it in the Identity provider's portal or in their documentation).
- In the SSO endpoint and Identity provider application ID fields, provide data from the Identity provider portal.
You can refer to the Identity provider's documentation.
- The Service provider redirect URI field is filled in by default.
From the Request binding dropdown list, select one method of exchanging authentication:
- HTTP POST
- HTTP REDIRECT
- In Response signature verification, select where the SAML signature is available.
In Response validation method, select one of the following methods for providing a signature certificate from the identity provider:
- Static - By choosing this option, you will be required to upload a file with the signature certificate in the Identity Provider Signature Certificate field. Each time the certificate changes, you are required to re-upload the file in the Identity Provider Signature Certificate field.
- Manifest - By choosing this option, you will be required to provide the URL from which the signature certificate will be downloaded. No action is required when the certificate changes.
This option is recommended.
To see further instructions, choose one of the following tabs depending on your choice of response validation method made in the previous step.
- To add a certificate, you must:
- Open the XML file received during registering the Synerise app in Identity provider's portal.
- Copy the certificate path.
- Paste it into a new file.
- Save the file.
- Upload the file to the Identity Provider Signature Certificate field.
- In Manifest URL with certificate, enter the URL from which the signature certificate can be downloaded.
- To add a certificate, you must:
- To define the maximum and acceptable time discrepancy between issuing authorization and receiving it in Synerise, in the Max clock skew, define the time period.
- Confirm by clicking Apply.
Test SSO
After completing the setup, test the integration.
- If you are logged in to Synerise, log out.
- Go here.
- Enter your email address.
- Click Continue.
- Click the Sign in with Provider's name (the text on the button depends on the value you entered in the Sign-in button label field.
Result: You will be redirected to your Identity Provider's service where you will be authenticated immediately if there is an active session or you will be asked to authenticate and as a result you'll be redirected back to Synerise.
Congratulation! You signed in through your Identity Provider.
When the process works as expected, you can switch the Authentication Mode setting, so only the SSO authentication method is allowed, excluding the option of authorizing through email and password.