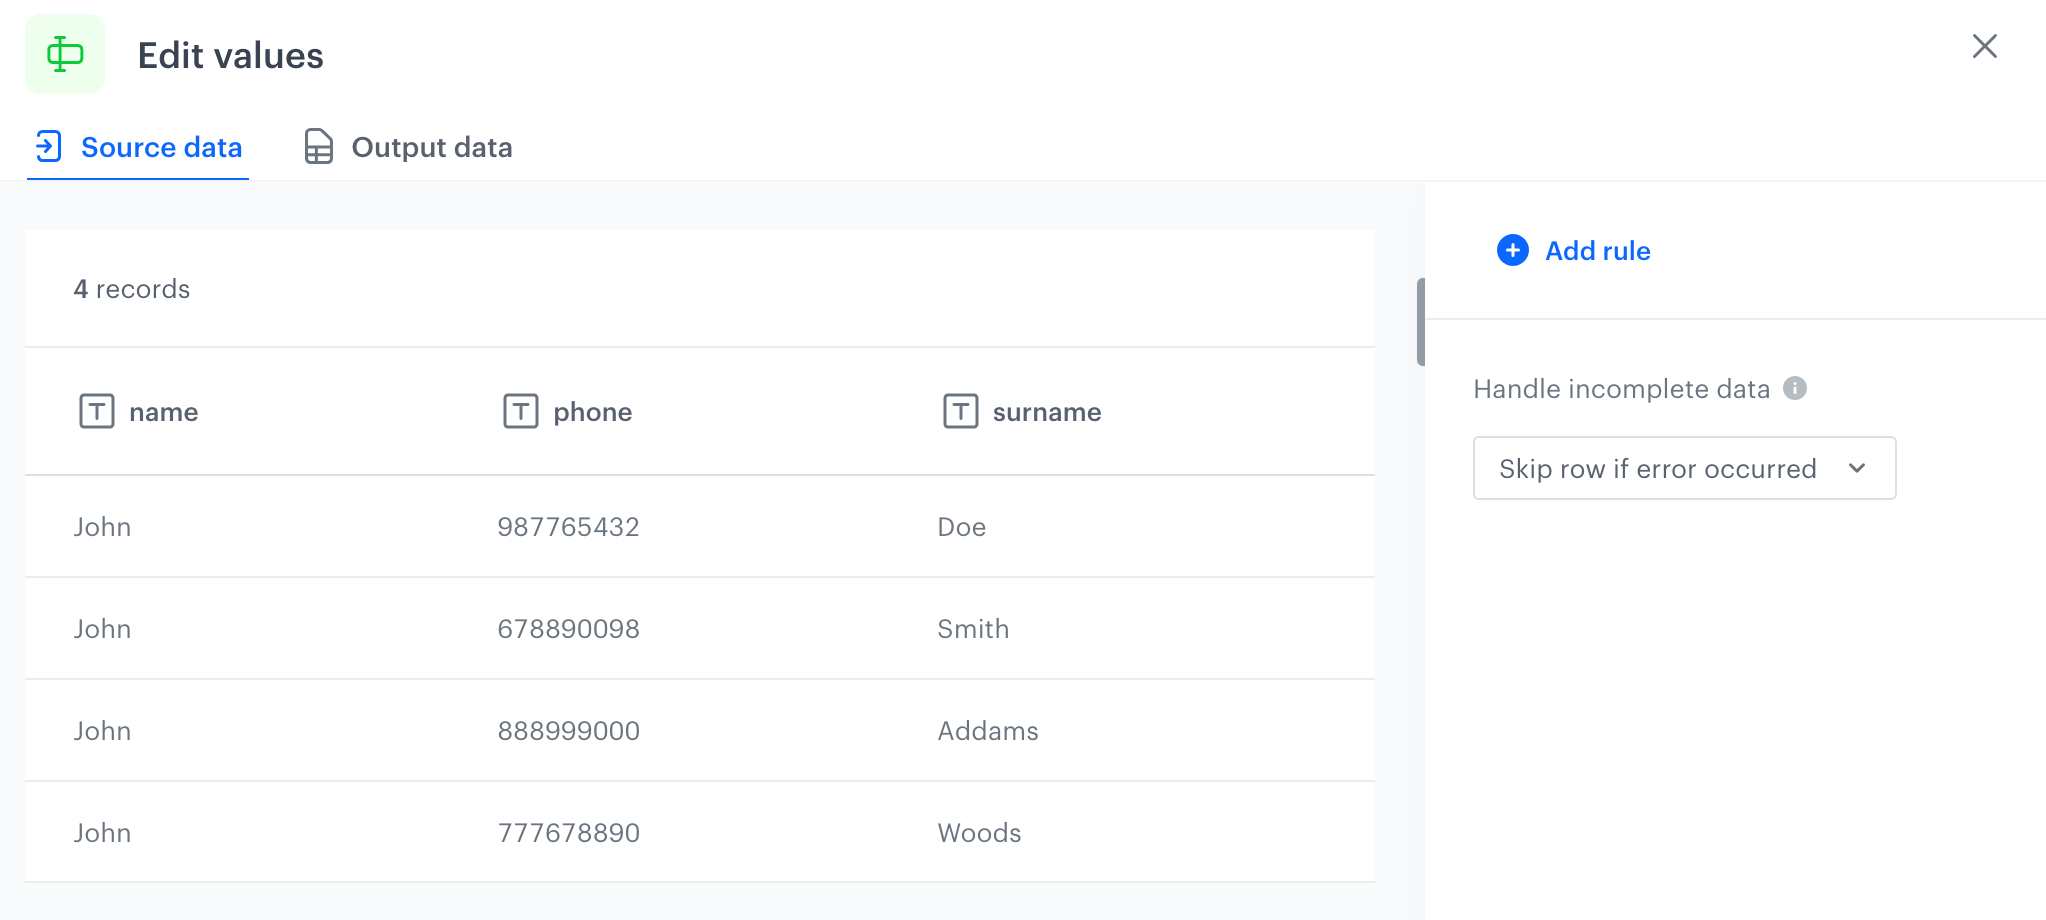
This node allows you to apply rules that specify how the values in the file are modified. You can also apply a filter to the rules to modify only the values that meet the filter criteria.
The scope of editing covers:
- adding a suffix/prefix to the values
- replacing the value with:
- a fixed value (selected values are replaced with a defined string)
- dynamic value (usage of Jinja that allows you to perform advanced operations on editing values, expcept for custom tags, for example, tags which refer to the customer's attributes, aggregates, expressions, and so on)
- values from other column,
- UUID (UUID v4)
- current date
In the settings of this node, you must select the columns from which the values will be edited. You can do this by selecting the column names or you can create a condition (referred to as a dynamic condition further in this article) that the column names must meet in order for the transformation to be performed on their values, for example, the column name must start with the letter "A".
Dynamic conditions are especially helpful when using a JSON file as a sample in the "Data Input" node. When a JSON file contains an object deeper than the root object, its items will be transferred to the Data Input node as separate columns named {object}.{parameter}. When choosing columns manually, you can't add those new columns from a JSON list to the transformation. Dynamic conditions can be set up to include those columns, for example by including columns whose name includes the name of the object they were created from.
Node configuration
- Double-click the Edit value node.
- Click Add rule.
Select one of the Include options, by clicking the
 icon next to these:
 - these - the default; it lets you select the columns in which you want to edit values.
- all except these - this option lets you select the columns in which you do NOT want to edit values. Values from the other columns will be changed as defined in the further steps.
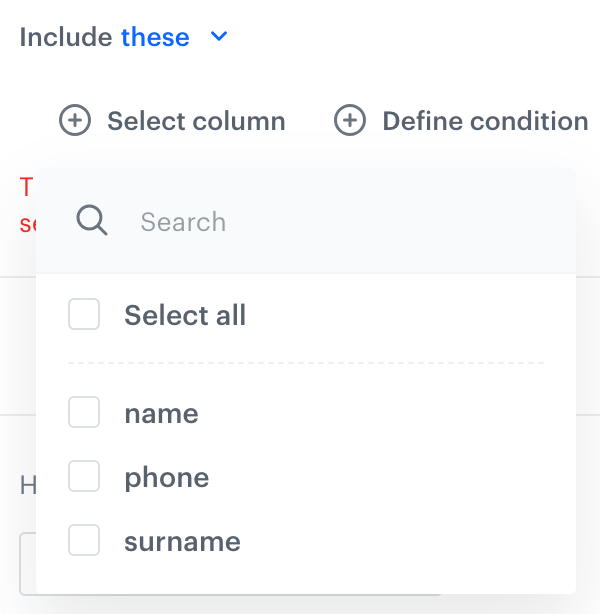
Select columns to include/exclude (according to the Include setting above) in one of the following ways:
- Select column - from the dropdown list, you can select the columns to be included or excluded from the transformation.
- Define conditions - you can create a dynamic condition which columns must meet to edit their values; for this purpose, you can use logical operators such as contain, starts with, ends with, and so on.
You can't combine dynamic conditions with the Include all except these option.
For further instructions, select one of the tabs below, depending on the option you have chosen in step 4.
Select column option - From the dropdown list, select the first column whose values will be edited.
- To add more columns, click
 icon.
icon. - To narrow down the scope of changes to the values in the column, apply a filter to the rule, by hovering a mouse cursor over the Include header and clicking
 icon.
icon.
Result: The filter settings appear:
The filter settings marked with a rectangle Using the following logical operators, define the settings of the filter. The filter will be applied to the selected columns and the transformation will be performed on the values which meet the filter conditions.
- Equal - Select this option if you want the transformation to be performed on the values which are equal to the string you provide.
- Not equal - Select this option if you want the transformation to be performed on the values which are different from the string you provide.
- Ends with - Select this option if you want the transformation to be performed on the values which end with a character or sequence you provide.
- Starts with - Select this option if you want the transformation to be performed on the values which start with a character or sequence you provide.
- Contain - Select this option if you want the transformation to be performed on the values which contain a substring or character you provide.
- Not contain - Select this option if you want the transformation to be performed on the values which do not contain a substring or character you provide.
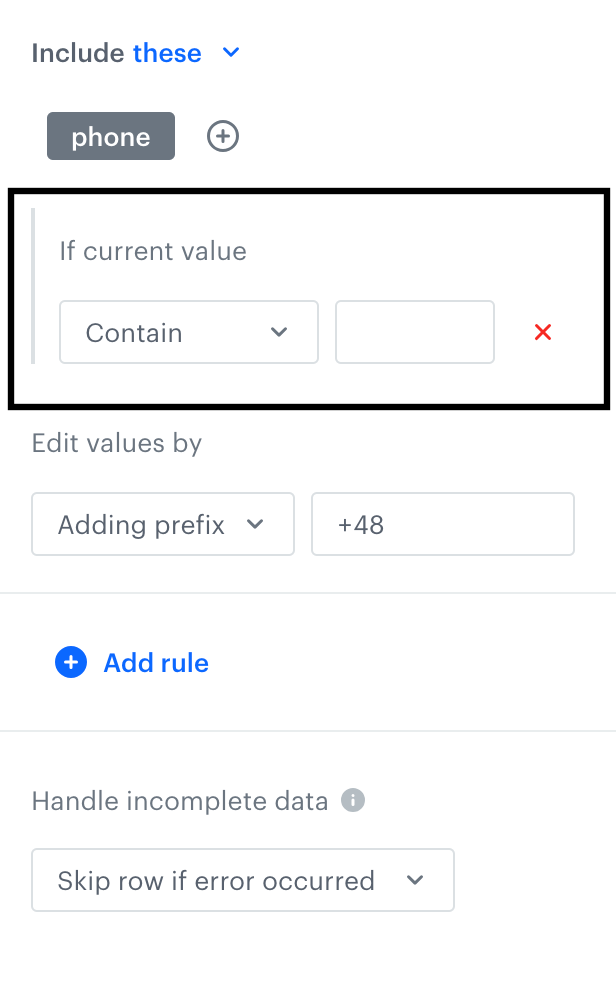
In the Edit values by field, select one from the following options:
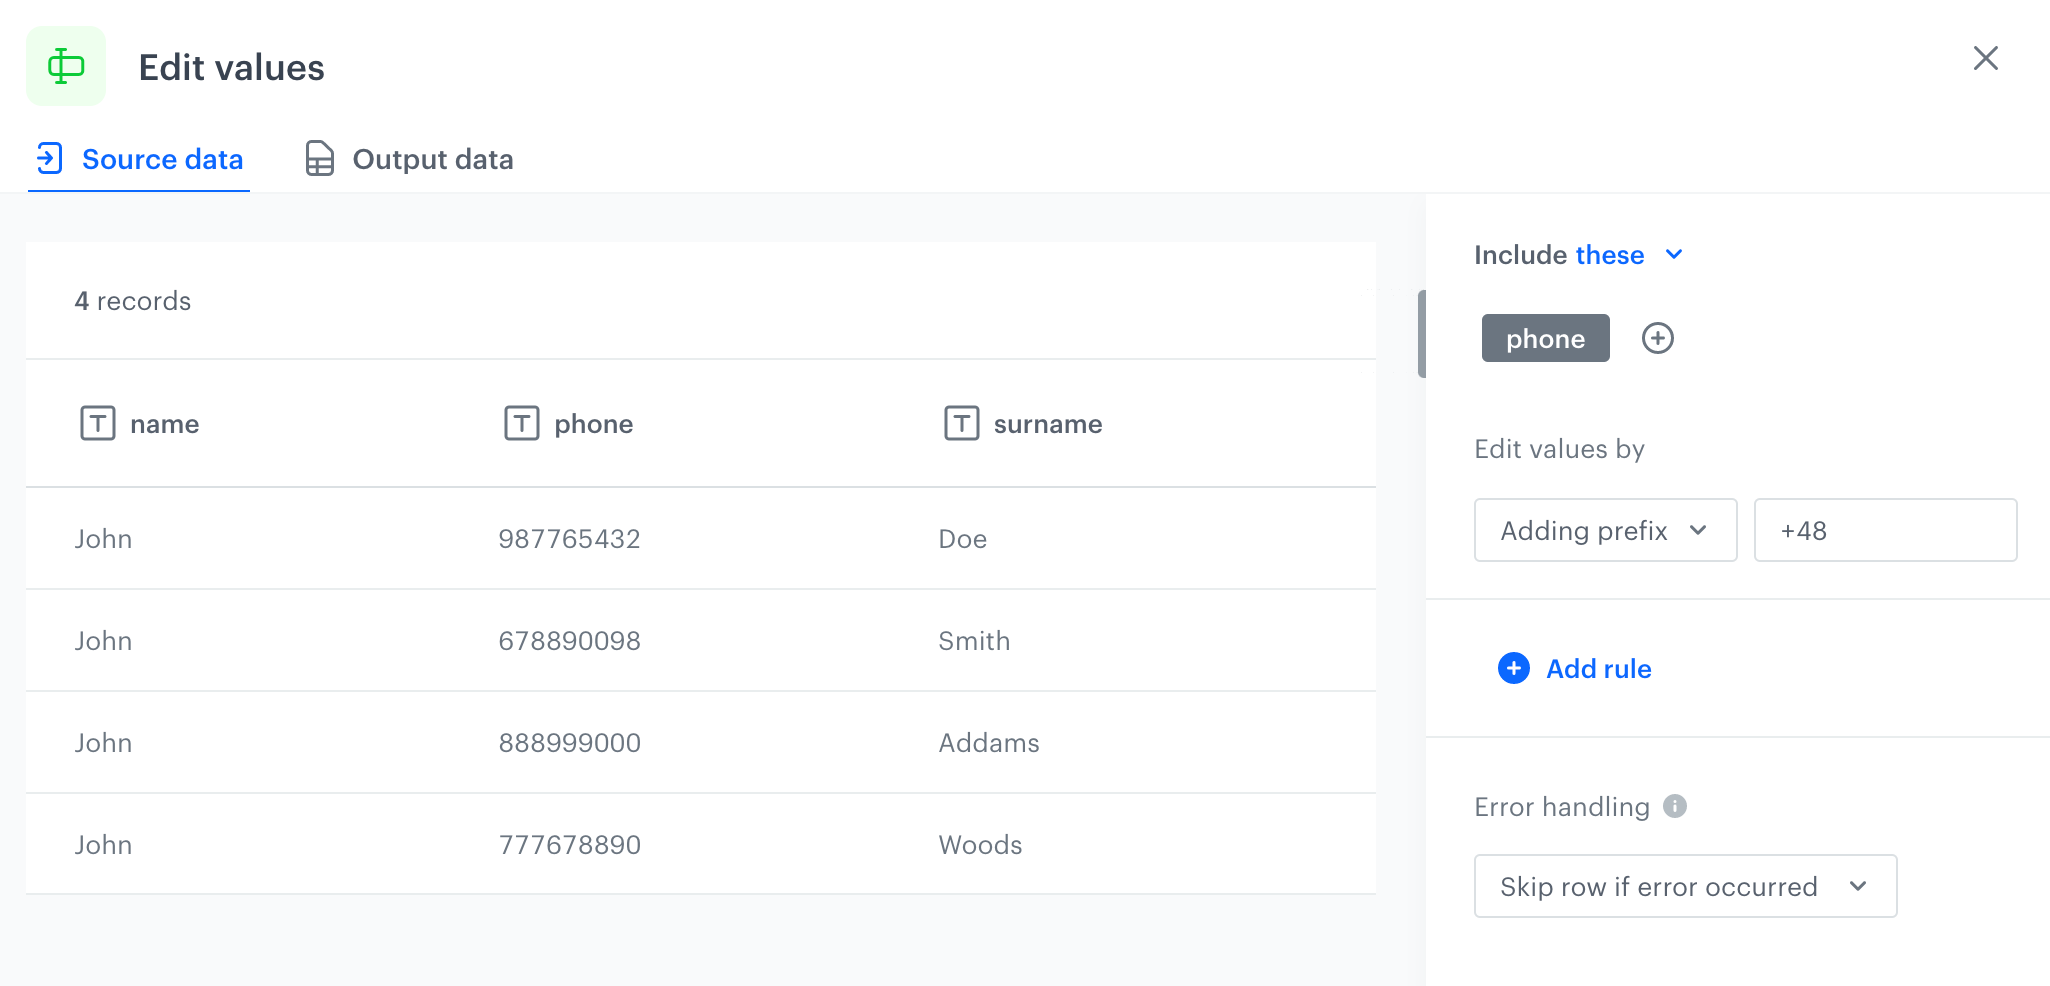
Adding suffix - Select this option if you want to add a group of characters to the end of a value, for example, applying a
, Ph.D.suffix to thesurnamecolumn transforms its values into values such asWoods, Ph.D.- Adding prefix - Select this option if you want to add a group of characters at the beginning of a value in a column, for example, applying a
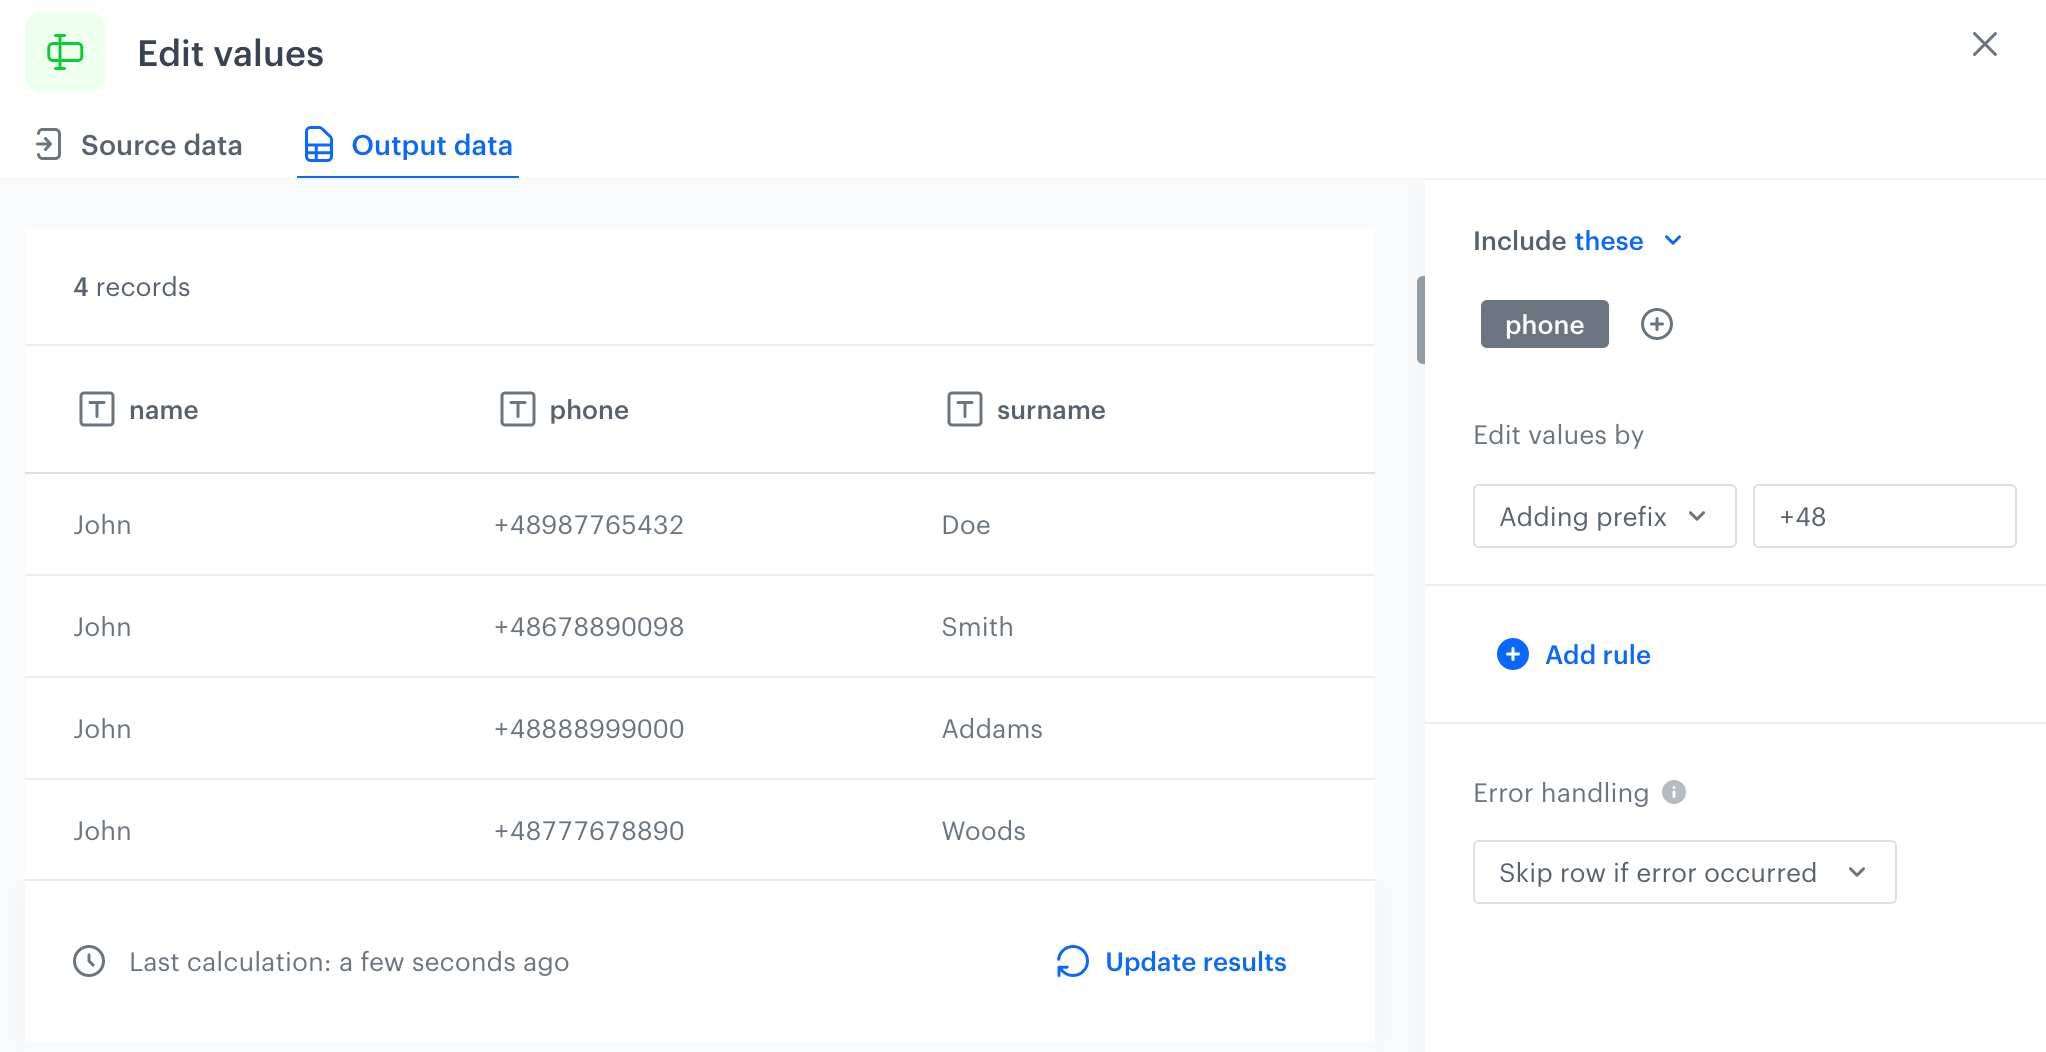
+48prefix to thephonecolumn transforms its values into values such as+487717678890. Replacing - Select this option if you want to entirely change the value with:
- Static value - This option replaces original value with the one you enter, for example, change
JohntoJohnatan - Dynamic value - This option replaces the original value according to the logic expressed by a Data transformation insert (Jinja). The use of custom Jinja tags (for example, referring to customer attributes, aggregates, expressions, and so on) is not possible. For example, using the following insert:
{{ root["name"]|replace("Bob", "Robert") }}transforms all occurrences ofBobin thenamecolumn intoRobert- only the part of the value which matches will be replaced. - Column - This option replaces the original value with values from a column you select.
- UUID - This option replaces the column values with a randomly generated UUID v4 (unique for each row).
- Current date - This option replaces the original value with the current date (the date and time are generated on an ongoing basis during the transformation). You can select the timezone and date format.
Example: Adding +48 prefix to the phone column - Static value - This option replaces original value with the one you enter, for example, change

Define condition option Select one of the following logical operators to define the conditions which column name must:
- Ends with - If a column name ends with a specified string, for example,
a, then the operation will be performed on the columns whose names end witha. - Starts with - If a column name starts with a specified string, for example,
pro, then the operation will be performed on the columns whose name starts withpro. - Contain - If a column name contains a specified string, for example
xyz, then the operation will be performed on the columns whose name containsxyz. - Not contain - If a column name doesn't contain a specified string, for example,
123, then the operation will be performed on the columns whose names doesn't contain123. - Regex - You can perform the operation on the column whose name matches the regular expression.
- Ends with - If a column name ends with a specified string, for example,
- To narrow down the scope of changes to the values in the column, apply a filter to the rule, by hovering a mouse cursor over the Include header and clicking icon.
Result: The filter settings appear:
The filter settings marked with a rectangle Using the following logical operators, define the settings of the filter. The filter will be applied to the selected columns and the transformation will be performed on the values which meet the filter conditions.
- Equal - Select this option if you want the transformation to be performed on the values which are equal to the string you provide.
- Not equal - Select this option if you want the transformation to be performed on the values which are different from the string you provide.
- Ends with - Select this option if you want the transformation to be performed on the values which end with a character or sequence you provide.
- Starts with - Select this option if you want the transformation to be performed on the values which start with a character or sequence you provide.
- Contain - Select this option if you want the transformation to be performed on the values which contain a substring or character you provide.
- Not contain - Select this option if you want the transformation to be performed on the values which do not contain a substring or character you provide.
- To add more rules, click Add rule and repeat steps from 2 to 5.
- You can check the preview of the file after changes in the Output data tab.
- To define what happens if rows contain errors, select one of the options available in the Error handling section.
- Confirm the settings by clicking Apply.
Current date option
Using the Current date option, you can enrich your data with a dynamically injected date and time which can be used, for example, to build an event salt. To define a rule with Current date:
- Select a timezone.
- Select one of the available formats:
- ISO (for example 2022-10-05T05:55:16.786596Z)
- Timestamp (for example 1664949342323)
- MMM d, YYYY (for example Oct 5, 2022)
- MMM d, YYYY, HH:mm:ss (for example Oct 5, 2022, 05:57:14)
- YYYY-MM-dd HH:mm (for example 2022-10-05 05:57)
- Custom - you can create your own date and time format.
Custom date format
You can use the following elements to build a custom format. The example values use October 05, 2022 as the date.
- MMM - name of month (Oct)
- MM - number of month (10)
- DD - day of year (278)
- dd - day of month (05)
- YYYY - year (2022)
- YY - year (22)
Handle errors
You can define what to do with failed values (for example, as a result of Jinja rendering or in other cases) in cells where data type modification failed. In the Handle incomplete data section, select one of the following options:
- Skip row if error occurred - It omits the row when an exception occurs.
- Skip if result is null or empty string - It omits rows with empty strings and
null(which may be the result of rendering Jinja) - Stop further transformation - The transformation stops at the row with an error. The data before the line that caused the error is transformed (and imported if the transformation rule is used in the Data Transformation node).
- Insert null if error occurred - Wrong values are replaced with
null. If you use such a transformation for the import of profiles, the existing value of an attribute is cleared and replaced with thenullvalue. - Insert empty string if error occurred - Wrong value is removed and the cell remains empty.
Example of use
In example transformation +48 is removed from all values in a given column.
- Start the transformation with the Data Input node.
- Click the node.
- Upload a sample file used to configure the transformation for later use and preview its results.
- Confirm the configuration of the node by clicking Apply.
- Add the Edit Values node.
- Double-click the node.
- Select the column to be transformed.
- Replace all values that begin with
+48in the selected column with an empty value. - Confirm the changes by clicking Apply.
- Add the Data Output node.
- In the preview of the Data Output node, all values in the column that began with
+48are transformed and the+48value was removed.