Send SMS node
The Send SMS node allows you to communicate with your customers through text messages based on events and other conditions defined in a workflow.
When a workflow that contains this node is launched, an SMS campaign is created as a result. You can find its statistics in the Communication module as well as in the Send SMS node itself.
The configuration of the node requires:
- selecting an account from which the message will be sent,
- selecting or creating a template
Optionally, you can:
- add custom parameters,
- send a test message
Requirements
- You must integrate a SMS account in Synerise and configure SMS gateway.
You can find more information about the procedures above here. - You must have profiles supplemented with phone numbers of your customers.
Node configuration
- Go to Automation > Workflows > New workflow.
- Select one of the profile trigger nodes, for example Profile Event.
- Click THEN > Send SMS.
- To open the configuration form of the node, click it.
Add content
In this part of the node configuration, you will select the SMS account from which the message will be sent and create the content of the message.
- In the Content section, click Define.
- From the From phone number drodpown list, select an SMS account from which the message will be sent.
- If you want to:
- Select a template, click Create message. From the list of the templates, select the one you want to use.
- If you make changes to the template, click Save and then Use in node.
- If you don’t make changes to the template, click Use in node.
- Create a message without using an existing template, click Create message > New template.
The template will be available only in this node for preview and modifications.
Result: You will be redirected to the SMS template builder.- Prepare the SMS template according to the instructions available in “Creating SMS templates”.
- After finishing the template, click Use in node.
- Select a template, click Create message. From the list of the templates, select the one you want to use.
- If you want to send this text message regardless of the marketing consent, tick Send without marketing agreement checkbox (not recommended).
- Confirm settings in the section by clicking Apply.
Adding additional parameters
If you want to add custom parameters to the events generated automatically by this Automation (for example, sms.send):
- In the Additional parameters section, click Define.
- Add additional parameters according to the instructions in “Sending SMS”, in the “Adding custom parameters” section.
Sending a test message
In this part of the node configuration, you can send a test SMS to users available in the Profiles module or any external phone number. This part is optional.
-
In the Test section, click Define.
-
In the search box, you can either search users who are available in the Profiles module or enter an external phone number.
-
In the search results:
- If you want to send the text message to existing profiles, select the users.
- If you entered a phone number which is not in the database, click Add {phohe number}.
-
In the search box, to confirm the list of recipients of test text message, click Add.
Result: The list of recipients you added is shown.
When you send a test message to a test user who is not added to the Profiles module in Synerise, the inserts will not display in the message. -
When your message is ready to be sent, in the upper right corner of the section, click Send test.
Defining additional node settings
- To
impose a limit on the action, switch the Action limit toggle. Enter a number and from the dropdown list, select the time unit. You can define how many times this action can be executed for the whole automation process (workflow), or you can define how many times per second/minute/hour/day/week/month can be executed.
If you want to make sure that this message is sent to a customer, even it exceeds the global limit of this type of messages for a single customer per day (more information is available here), enable the Ignore limits toggle. You may apply it to system messages such as a transaction confirmation, notifications about order delays, and so on.
- If you want to exclude customers who belong to the global control group from the recipients, enable the Enable Global Control Group option.
This option is only visible in workspaces where the global control group is enabled.
Example of use
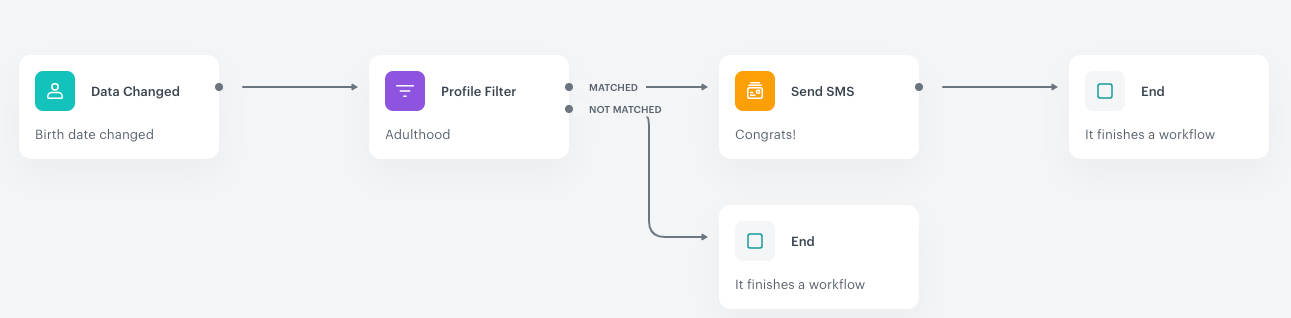
The purpose of this automation is to send a text message with informing a customer about access to special offers.
- The first step is to add the Data Changed trigger that changes the birthdate (without defining a specific date).
- The next stage of the automation process is the Profile Filter node, a condition node, which checks:
- whether the birthdate change meets the requirement of a segmentation that defines customers as adults.
- If customers who meet the above condition have a phone number on their cards (without the phone number this action will not succeed).
- If customers belong to the segmentation, they proceed to the next stage. A text message is sent to them.
- When the text message is sent, the process ends.