The Enrich with Catalog node allows you to enhance your dataset by adding information from a selected catalog. It works by matching records in your data with records in the catalog, using a designated item key column from your dataset and the primary key column from the catalog.
The primary key (also called the item key) in a catalog is the column that contains unique identifiers for each item. When you preview the catalog, this column will be highlighted as the primary key.
Catalogs store different types of data and are often used to enrich profiles imported into Synerise or to add more details to data sent outside the system. This node makes data transformation more powerful and helps Automation Hub and the Catalogs feature work better together.

Additional important notes
- When enriching data, if the enriched columns already exist in your dataset, the values will be overwritten by the catalog values.
- The catalog’s primary key column will not be included in the enriched dataset.
- Once enriched data is imported into Synerise, the enrichment cannot be undone or reverted.
Requirements
- You must be assigned with a user role with the catalog permissions.
- You must have at least one Synerise catalog with data.
Make sure that the key column in your dataset contains values that correspond to the values in the primary key column of the catalog you select for enrichment. Otherwise, an error is triggered and handled based on your selected error handling option.
Node configuration
- Click the Enrich with Catalog node.
Result:
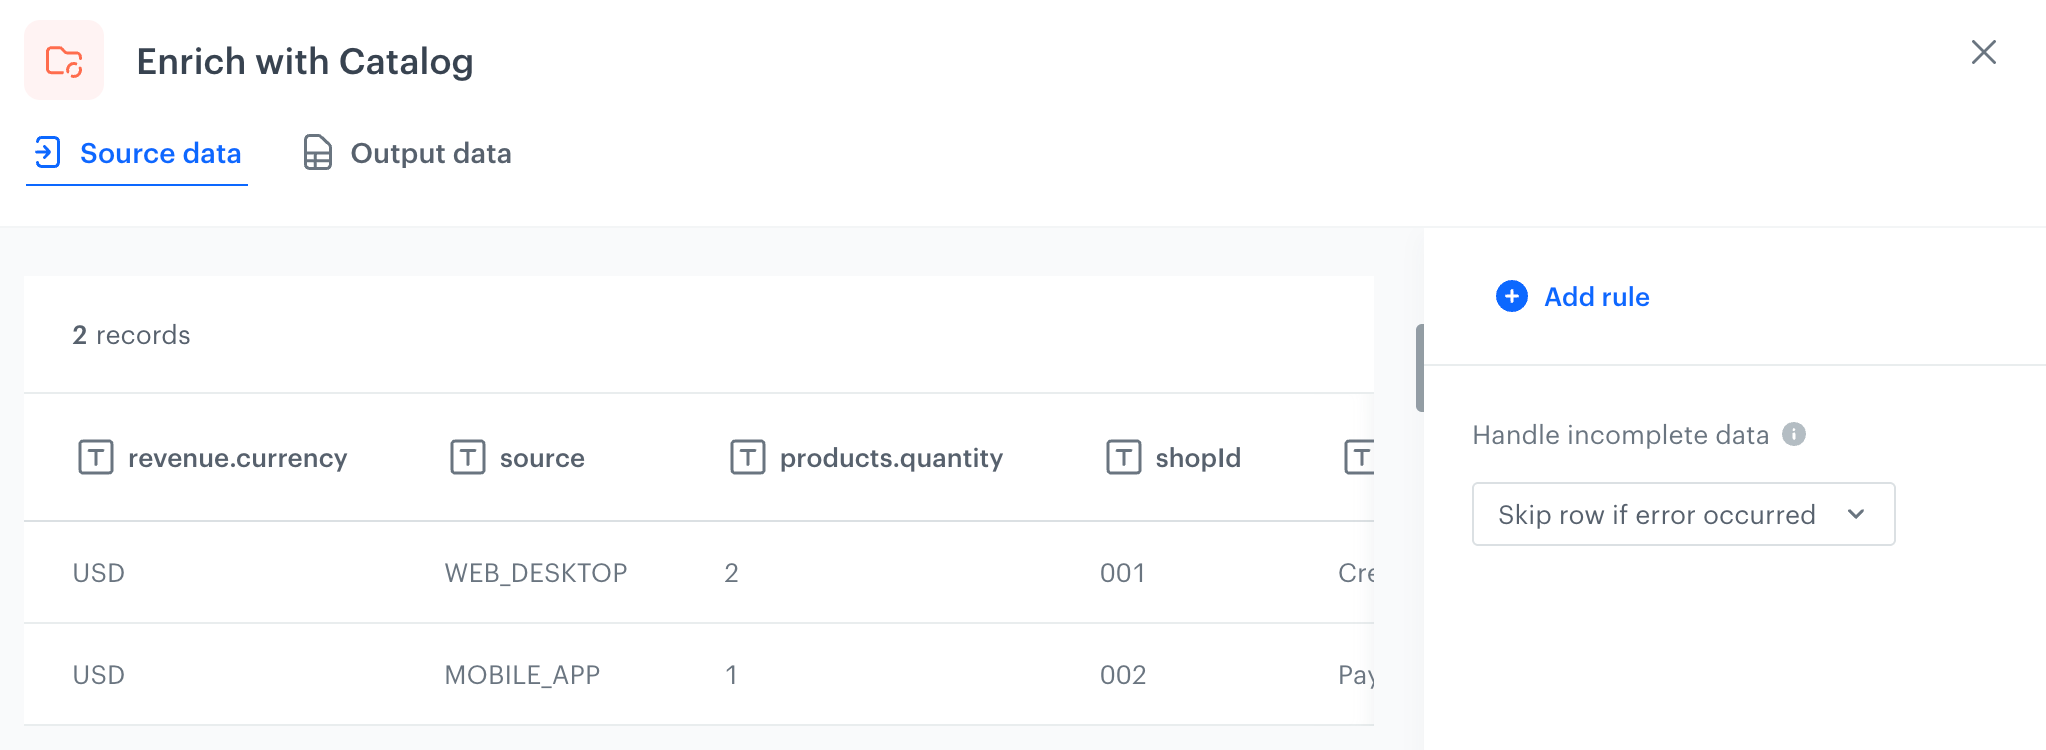
An initial view of the configuration form in the Enrich with Catalog node - Click Add rule.
Result:
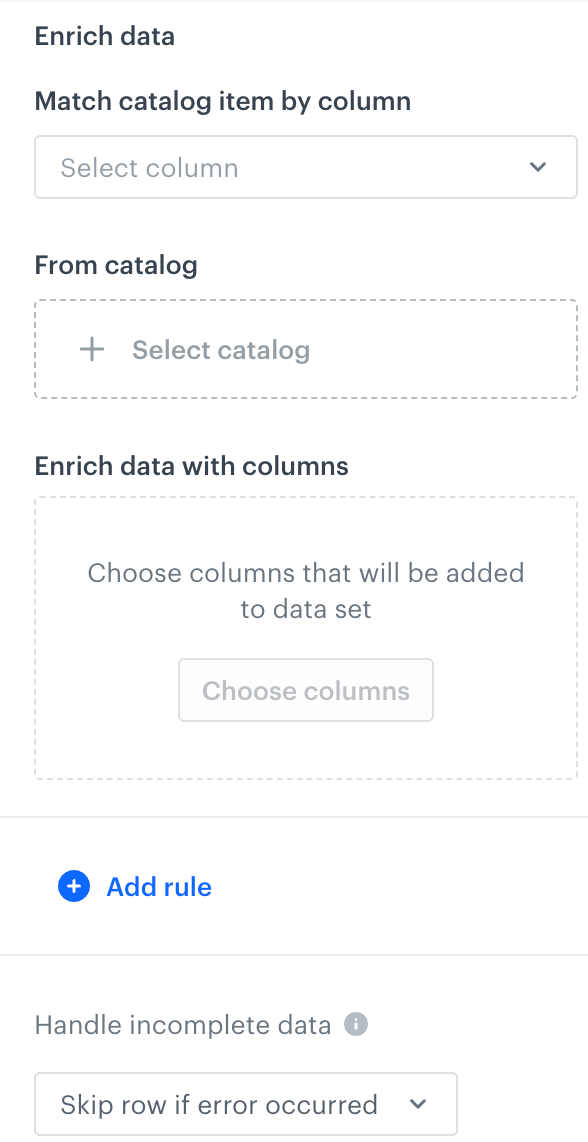
The configuration form in the Enrich with Catalog node on the right panel - In the right panel, from the Match catalog item by column dropdown list, select the sample data column that will be used to match records from the catalog.
The values from the declared column should correspond to the values in the primary key column of the catalog you select for enrichment. - From the Select catalog dropdown list, select the catalog which will be used for enriching the data.
- From the Enrich data with columns section, click Choose columns.
Result: A pop-up appears. - Select the columns from the catalog which will be added to the data output.
- Optionally, you can add more catalogs to enrich the data by clicking Add rule and repeating steps 3-6.
Make sure these catalogs and the data being enriched contain a shared key (column).
- To define what happens if rows contain errors, select one of the options available in the Handling incomplete data section.
- Confirm by clicking Apply.
Handling incomplete data
When there is no matching record in the catalog for a given item key or if cell values fail (e.g., Jinja rendering failure), an error occurs and you can choose how the node behaves:
- Skip row if error occurred - Skips the row if no matching record is found or an error occurs and continues processing other rows.
- Skip if result is null or empty string - If a value from a catalog is null or empty, such rows will be skipped.
- Stop further transformation - Stops the transformation process with an error.
- Insert null if error occurred - If there is no matching record in the catalog, a selected column will be added with the null value.
- Insert empty string if error occurred - If there is no matching record in the catalog, a selected column will empty strings will be added.
Example of use
In this example, we will create a transformation rule which will enrich information in transaction.charge events during the import of transactions to Synerise. Based on the store ID in the event, we will enrich it with the store’s address data stored in the Catalog.
For the purposes of this example, you must create a catalog which contains the ID of the store (this column will be a primary key), and other address details in separate columns.
Click here to expand the contents of the example catalog
shopId,shopName,address,city,state,zipCode,country,phoneNumber,email,openingHours,managerName,hasFuelStation,numberOfEmployees 001,Shop XYZ Lake Highlands,123 Main St,Dallas,TX,75201,USA,214-555-0101,downtown@example.com,06:00-23:00,John Smith,Yes,15 002,Shop XYZ Lakewood,456 Oak Ave,Dallas,TX,75202,USA,214-555-0102,midtown@example.com,06:00-23:00,Sarah Johnson,No,12 003,Shop XYZ Oak Cliff,789 Pine Rd,Dallas,TX,75203,USA,214-555-0103,central@example.com,07:00-22:00,Mike Brown,No,10Click here to expand the contents of a sample file for data transformation
client.id,orderId,paymentInfo.method,products.finalUnitPrice.amount,products.sku,products.quantity,revenue.amount,revenue.currency,value.amount,value.currency,source,shopId,products.finalUnitPrice.currency 21052,ORD12345,Credit Card,29.99,SKU001,2,59.98,USD,60,USD,WEB_DESKTOP,001,USD 21052,ORD12346,PayPal,15.50,SKU002,1,15.50,USD,15.50,USD,MOBILE_APP,002,USDBoth catalog contents and the sample file for data transformation contain a shopId column - this column will be used for matching these two sources.
Creating a transformation rule
- Start with the Data Input. Upload a sample data with transactions you will import to Synerise.
- As the next node, add Enrich with catalog. In the settings of the node:
- Click Add rule.
- In Key, select shopId.
- In From catalog, select the catalog that contains shop information (it must contain a shopId column).
- From Enrich data with columns, select the columns from the catalog which will be added to the data output.
- Confirm by clicking Apply.
- Add the Data Output node. No further configuration is required in this node.
Result:
A complete transformation rule that enriches data with information from a selected catalog - Save the rule.
Creating a workflow which imports transactions
In this part of the example, we will create a workflow which imports transactions but before the import, the data will be enriched with shop information according to the transformation rule created in the first part of the example.
- Start with the Scheduled Run node. In the configuration of the node define the frequency with which the workflow will be triggered.
- Retrieve data for import by using one of the following nodes:
- Add the Data Transformation node. Select the transformation rule you have created in the previous part of the process.
- Add the Import transactions node. This node doesn't require configuration.
- Add the End node. This node doesn't require configuration.
Result:
A complete workflow rule that retrieves transactions from external file, enriches data with information from a selected catalog and imports enriched transactions to Synerise - Start the workflow by clicking Save & Run.
Result: The transaction is added to the profile activity list as atransaction.charge event, which is enriched with the shop's address and the shop manager's name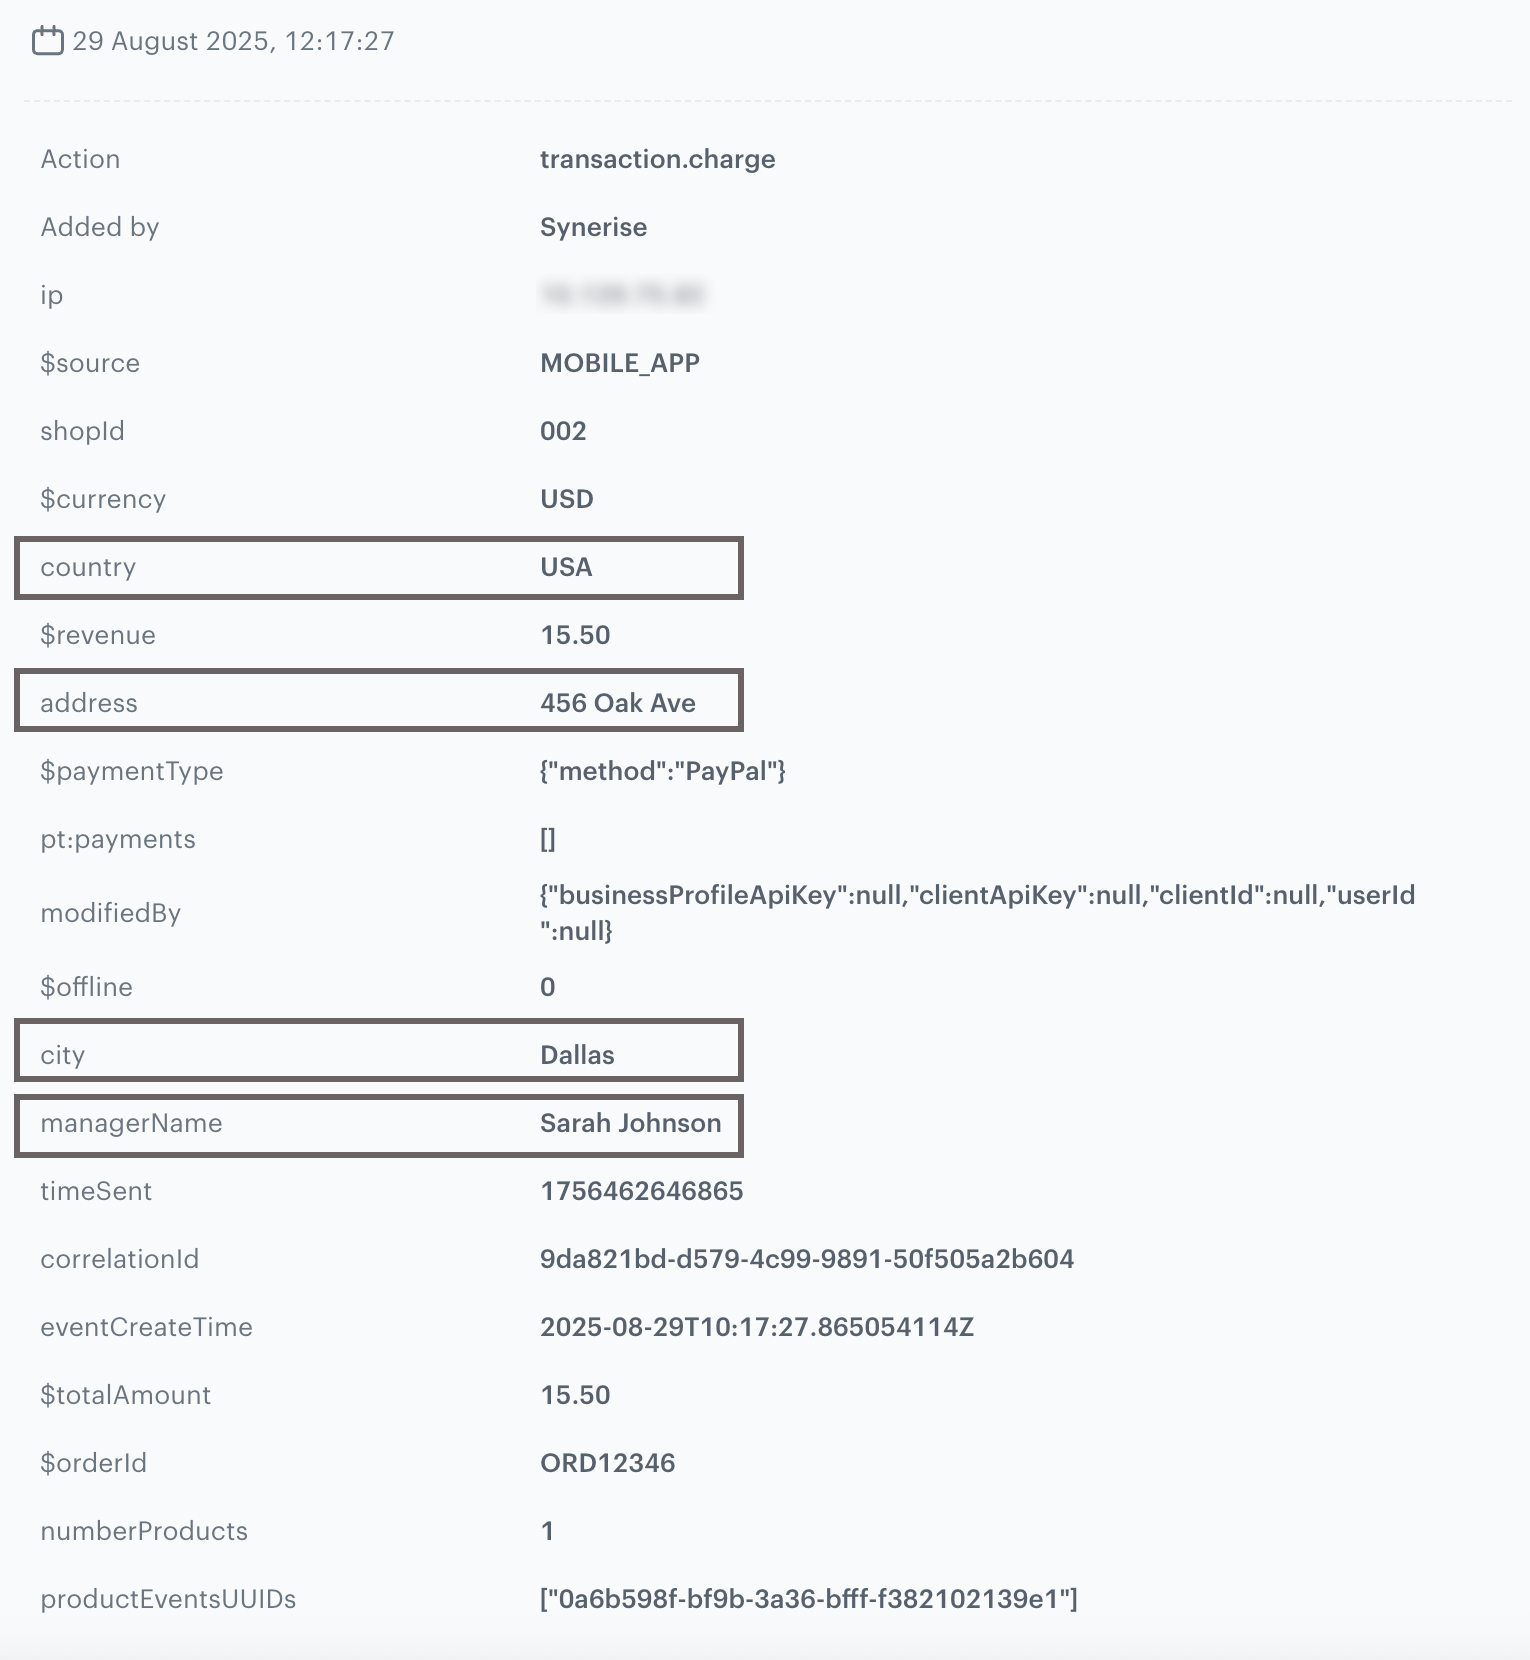
A preview of the transaction.charge event with enriched data