You can use the Get File node to transfer the files from your server to the workflow using HTTP protocol.
- Maximum file size: 5 GB (5 000 000 000 bytes).
Node configuration
Set up a connection
In this part of the process, you must define how you will get access to your source. By selecting the authentication method and providing required information, you establish a connection.
- Select HTTPS > Get File.

Selecting the authentication method - Select the authentication method:
No authentication - No authentication is required.
Login & Password - This method lets you use basic authentication to authenticate with the remote server.
Click here to see the instructions
- Click Select connection.
- If the connection you want to use is in the list, select it and proceed to Filling out the configuration form.
- If the connection list is empty or you don't see a connection, you must:
- At the top of the dropdown list, click Add connection.
- In the Connection name field, enter the name of your connection (it's visible only in Synerise).
- In the Login field, enter a login.
- In the Password field, enter the password.
- Click Create.
The connection you created can be used later in Workflows and Brickworks external sources.
- If the connection list is empty or you don't see a connection, you must:
Custom connection - This method sends an authentication token request before executing the main request defined in the Outgoing integration node settings. The token is fetched when the request data is uncached, then cached according to its TTL, and added to the target request.
Click here to see the instructions
- Click Select connection.
- In the connection list:
- If the connection you want to use is in the list, select it and proceed to Defining the request section in this article.
- If the connection list is empty or you don't see a connection, you must:
At the top of the dropdown list, click Add connection.
- In the Authorization request tab, click Define.
Result:
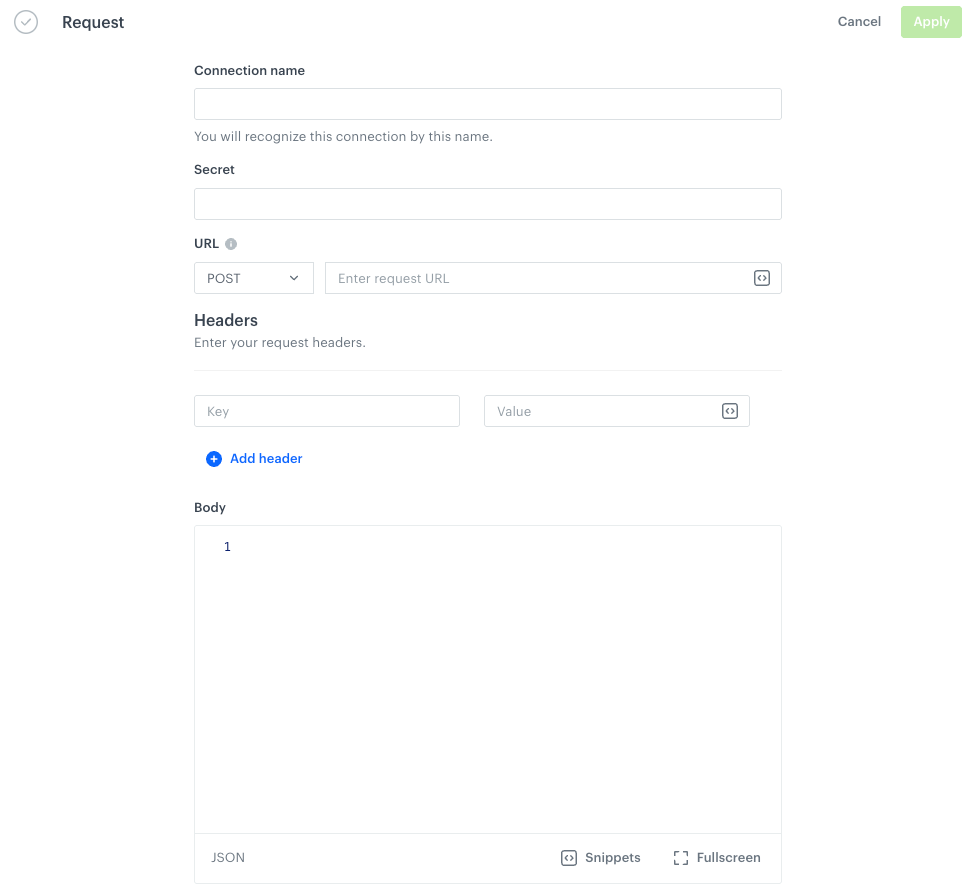
The Request section in the configuration of a custom connection - In the Connection name field, enter the name of your connection (it's visible only on the Select connection dropdown list or on the list of connections in Settings > Connections).
- In Secret, enter a value which is required in the request to obtain a token. This value will be anonymized and displayed as asterisks.
- In the Headers section, add request headers (in the left field, enter the key; in the right, enter its value).
- In the Body field, enter the request body.
For example:
where{ "api-key": "{{secret}}" }{{secret}}retrieves the value of the Secret field to anonymize the token. - Confirm the settings in the Authorization request tab by clicking Apply.
- In the Token placement settings section, click Define.
- Click Retrieve response.
Result:
Retrieved token in the Response section in the custom connection configuration form - If you:
- specify the value in the Headers section, the extracted authorization data from the response will be added as a header to the target request.
provide the value in the URL Parameters section, the data will be appended to the target request’s URL as a parameter.
You can use the following values to retrieve values from the response:authResponseBody- a variable that contains the full body of an authentication responseauthResponseStatusCode- a variable that contains the status code of an authentication responseauthResponseHeaders- a variable that contains the headers of an authentication response
For example:
Bearer {{ authResponseBody | fromjson | attr("token") }}
It takes the
JSONresponse body stored inauthResponseBody, parses it into a usable structure, and extracts the value of thetokenfield. Outputs a string like:Bearer "eyJhbGciOiJIUzI1NiIsInR5cCI6IkpXVCJ9..."
- In TTL field, specify the how long the cached response from the external request will be valid.
If you leave this field empty, it's 60 seconds. - Confirm by clicking Apply.
Synerise API key - This method is particularly recommended for the users who use Synerise REST API. It lets you select a connection that includes an API key with the required permissions. This way, the requests to Synerise API are executed by this integration and a JWT is not required as it is generated while sending requests and attached to the request headers.
Click here to see the instructions
- Click Select connection.
- If the connection you want to use is in the list, select it and proceed to Filling out the configuration form.
- If the connection list is empty or you don't see a connection, you must:
- At the top of the dropdown list, click Add connection.
- In the Connection name field, enter the name of your connection (it's visible only in Synerise).
- From the API key dropdown, select the API key.
- Click Create.
The connection you created can be used later in Workflows and Brickworks external sources.
- If the connection list is empty or you don't see a connection, you must:
OAuth2 Client Credentials - This method lets you use your OAuth2 credentials to authorize.
Click here to see the instructions
- Click Select connection.
- In the connection list:
- If the connection you want to use is in the list, select it and proceed to Filling out the configuration form.
- If the connection list is empty or you don't see a connection, you must:
- At the top of the dropdown list, click Add connection.
- In the Connection name field, enter the name of your connection (it's visible only in Synerise).
- In the Token endpoint URL field, enter the URL used to obtain an access token from the authorization server.
- In the Client ID field, enter a unique identifier assigned to your application by the service provider.
- In the Client secret field, enter a confidential key issued alongside the Client ID. It is used to securely authenticate your application.
- Optionally, in the Scope field, define the level of access your application is requesting. Scopes specify which actions or data your application can access (for example, read user data, send messages). Refer to the API documentation for the correct scope values.
- Click Create.
The connection you created can be used later in Workflows and Brickworks external sources.
API Key - This method lets you authenticate using an API secret by including it in a header of your choice or in a URL parameter — example outputs:
the authorization header:
Authorization: Bearer [secret]URL parameter:
client_id=[rendered secret].
When you use this connection in the Outgoing Integration node, the token will be automatically added to either the request header or the request URL with every request.Click here to see the instructions
- Click Select connection.
- If the connection you want to use is in the list, select it and proceed to Defining the request section in this article.
- If the connection list is empty or you don't see a connection, you must:
- At the top of the dropdown list, click Add connection.
- In the Connection name field, enter the name of your connection (it's visible only in Synerise).
- In the Secret field, enter an API Key.
- If you:
- specify the value in the Headers section, the API key will be added as a header to the request. For example,
x-api-key: {{secret}}where{{secret}}retrieves the value of the Secret field to anonymize the API key value. - provide the value in the URL Parameters section, the API key will be appended to the request’s URL as a parameter.
- specify the value in the Headers section, the API key will be added as a header to the request. For example,
- Click Create.
The connection you created can be used later in Workflows and Brickworks external sources.
- If the connection list is empty or you don't see a connection, you must:
Fill out the configuration form
- From the Method dropdown list, select the method.
- In the URL field, enter the endpoint.
From the File format dropdown list, select the format of the file:
- XML Feed
- JSON
- JSON Lines
- CSV - Provide the details on how to format the imported file:
- From the Delimiter dropdown, select the character that marks the end of a column.
- From the Quotation mark dropdown list, select the characters that contain the text or data type.
- From the Escape character dropdown lists, select the character changes the default interpretation of a character or a string followed by the character.
- In the Headers fields, define request headers required by the HTTP API.
- Confirm the settings by clicking Apply.
Examples of use
In this example, you can launch a workflow which retrieves a Synerise catalog by means of HTTPS protocol and send it further to a SFTP server. If needed, the workflow can perform a transformation of data retrieved from the catalog in order to meet data structure requirements in the SFTP server.
If you decide to use the Data Transformation node you must build a data transformation workflow.

- Add the Scheduled Run node.
- In the configuration of the node, set it to immediately.
- Add the Get File node by clicking THEN > HTTPS.
- In the configuration of the node:
- Select the authentication method.
- If no connections are available or you want to create a new one, see Add connection.
- If you selected an existing connection, proceed to defining the integration settings.
- Leave the method at default (GET).
- In the URL, enter the address of the endpoint (you can get it here
- As a file format, from the dropdown list, select CSV file.
- Verify the following fields: Delimiter, Quotation mark, Escape character, Charset, Line ending.
- Configure settings for the Headers section.
- Confirm by clicking Apply.
- Select the authentication method.
- Optionally, you can add the Data Transformation node to modify the data retrieved from the catalog to comply with the data structure standards in your SFTP.
- Add the Send File node by clicking THEN > SFTP.
- In the configuration of the node:
- Select the authentication method.
- If no connections are available or you want to create a new one, see Add connection.
- If you selected an existing connection, proceed to defining the integration settings.
- Enter the URL to the server.
- Enter the path to the directory.
- Enter the name of the file under which you want to send the data to the server.
- Select the format of the file.
- Confirm by clicking Apply.
- Select the authentication method.
- Add the End node.