The Send Web Push node allows you to communicate with your customers through wep push notifications based on events and other conditions defined in a workflow.
When a workflow that contains this node is launched, a web push campaign is created as a result. You can find its statistics in the Experience Hub and in the Send Web Push node itself.
The configuration of the node requires:
- selecting or creating a template
- defining the web push lifespan
Optionally, you can:
- add UTM and URL parameters,
- add custom parameters,
- send a test message
Requirements
- You must implement a tracking code into your website.
- You must configure web push notifications.
- You must have Web Push subscribers.
Configuration
- Go to Automation Hub > Workflows > New workflow.
- Select one of the profile trigger nodes, for example Profile Event.
- Click THEN > Send Web Push.
- To open the configuration form of the node, click it.
- Optionally, next to the node name, you can add a custom node title which will be displayed on the node.
- If you want to assign a tag to the web push campaign you will send through the workflow, under the node title, click Add tag.
- From the dropdown list, select the tag.
The list contains only the tags which are available in the predefined campaigns tag folder.
Assigning tags helps you organize your communications by categorizing campaigns across different channels. Additionally, you can control communication limits by applying restrictions to these tags.
Select or create template
In this part of the node configuration, you will create the content of the message.
- In the Content section, click Define.
If you want to:
- Select a template, click Create message. From the list of the templates, select the one you want to use.
- If you make changes to the template, click Save and then Use in node.
- If you don't make changes to the template, click Use in node.
- Create a message without using an existing template, click Create message > New template.
The template will be available only in this node for preview and modifications.
Result: You are redirected to the template builder.- Prepare the template according to the instructions available in "Creating web push templates".
- After finishing the template, click Use in node.
- Select a template, click Create message. From the list of the templates, select the one you want to use.
- If you want to send this text message regardless of the marketing consent, tick Send without marketing agreement checkbox (not recommended).
After the node is configured, the name of the selected template is displayed directly on the node. To preview the template without opening the node settings, click the eye icon on the node. If the template was created directly in the node settings, the ID of the inplace content is displayed on the node instead of the template name.
- Confirm settings in the section by clicking Apply.
Define lifespan
Define the time for how long the push service will keep trying to send the notification to the browser. If the push service can’t deliver the notification within that time (for example, due to the user’s device being turned off), the notification will be discarded. The notification is only shown to customers whose browsers are running (also in the background) within this time range.
- In the Web push lifespan section, click Define.
- In the Webpush lifespan (TTL) field, enter the number.
- From the dropdown list, select the time unit.
- Confirm the settings by clicking Apply.
Adding UTM and URL parameters
In this part of the node configuration, you will define UTM and URL parameters that will be added to the links in the web push campaign launched with the start of the workflow. This part is optional.
- In the UTM & URL parameters section, click Define.
- Fill in the following fields: UTM campaign, UTM medium, UTM source, and UTM term.
- To add URL parameters, in the URL parameters section, click Add parameter.
- Enter values for the Parameter and Value fields.
- Confirm by clicking Apply.
Adding additional parameters
If you want to add custom event parameters events generated automatically for the web push channel, in the Additional parameters section, click Define. Add additional parameters according to the instructions in the "Define additional parameters" section.
Sending a test message
In this part of the node configuration, you can send a test mobile push notification only to the users available in Behavioral Data Hub, who have the has_web_push_devices attribute set to true.
- In the Test section, click Define.
- In the search box, you can search users who are available in Behavioral Data Hub > Profiles.
- In the search results, select the users.
- In the search box, to confirm the list of recipients of test push notification, click Add.
Result: The list of recipients you added is shown. - When your message is ready to be sent as a test, in the upper right corner of the section, click Send test.
Defining additional node settings
- To impose a limit on the action, switch the Action limit toggle. Enter a number and from the dropdown list, select the time unit. You can define how many times this action can be executed for the whole automation process (workflow), or you can define how many times per second/minute/hour/day/week/month can be executed.
- If you want to make sure that this message is sent to a customer, even it exceeds the global limit of this type of messages for a single customer per day (more information is available here), enable the Ignore limits toggle. You may apply it to system messages such as a transaction confirmation, notifications about order delays, and so on.
- If you want to exclude customers who belong to the global control group from the recipients, enable the Enable Global Control Group option.
This option is only visible in workspaces where the global control group is enabled.
Example of use
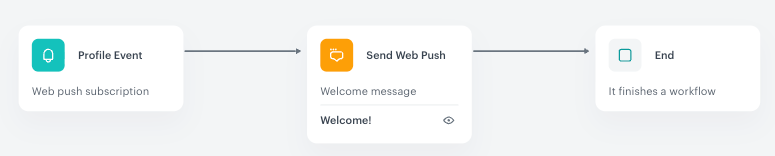
This scenario sends a welcome web push notification to customers who subscribed to web push notifications.
- It starts with a Profile Event trigger node. In the settings of the trigger, select a web push subscription event.
- Add Send Web Push action. In the settings of the action select the template of the notification (which you need to prepare before) and set the notification lifespan (TTL).
- When the notification is sent to a customer, the process ends.